E-SYSTEM
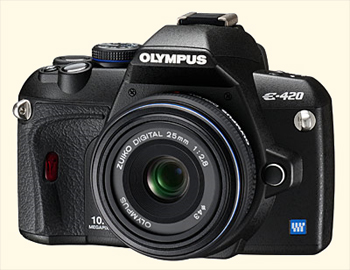
E-420
how to set up/customize your camera
|
E-SYSTEM
E-420 how to set up/customize your camera
|
|
GLOSSARY of ABBREVIATIONS: I have been asked to provide a small glossary of the more common abbreviations I use throughout various articles appearing on this website. Abbreviations, while useful can be difficult to understand, especially for those whose native language is not English.
AEL/AFL = Auto Exposure Lock/Auto Focus Lock
AE = Auto Exposure
AF = Auto Focus
CCD = Charged Coupled Device
CD AF = Contrast Detect Auto Focus
CMOS = Complementary metaloxidesemiconductor
CW = Centre Weighted (metering)
DOF = Depth of Field
DSLR = Digital Single Lens Reflex camera
EFL = Equivalent Focal Length (on a 24x36mm film camera)
ESP = Electro Selective Pattern (metering)
EVF = Electronic Viewfinder
fps = frames per second
GN = Guide Number (flash)
I.S. = Image Stabilization
LCD = Liquid Crystal Display
MP = MegaPixels/Mega Photosites
OMZ = OM Zuiko (lens)
ORF = Olympus Raw File
OVF = Optical Viewfinder
PD AF = Phase Detect Auto Focus
RC = Remote Control
SSWF = Supersonic Wave Filter (body feature)
SWD = Supersonic Wave Drive (lens feature)
TTL = Through The Lens
USB = Universal Serial Bus
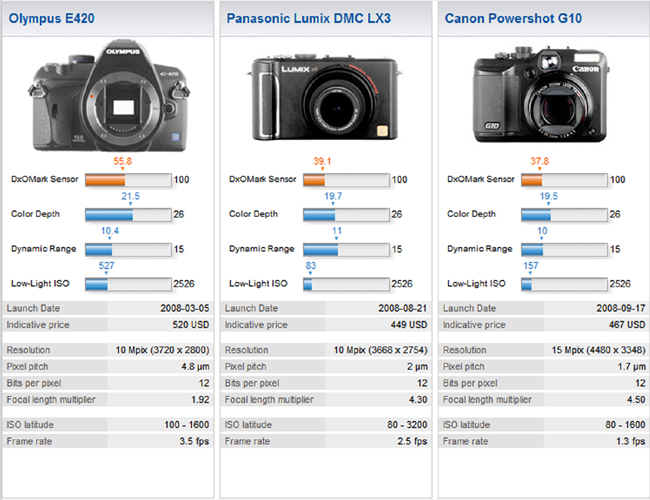
ZD = Zuiko Digital (lens) BACKGROUND Many of us DSLR users have a high-ish spec compact camera available when they do not fancy carrying around a DSLR body and a host of lenses and other accessories. It's a relief to simply pop a small camera into your pocket and for some time I've relied on my faithful Casio EX-Z850 for this. But while it's a great camera that produces pretty good results and one I've recommended to many, some of the images can be over-cooked and anything other than base ISO performance leaves a little to be desired. Its tiny sensor and over-processing can sometimes leave the final image a little disappointing. Like many others I'm looking for the holy grail - DSLR results from a compact digi-cam. Having heard good things about about two 'new' cameras I looked at both the Panasonic LX3 and the Canon G10; both of which are well over £300. I was tempted by both, each having their attractions; the LX3 with its fast lens (with restricted reach) and the G10 for its better zoom range and feature set. The LX3 is expensive (£325 in UK) and the G10 slightly more so (£370 in UK). But in many ways no matter how good the lens, internal processing or feature set of a compact camera, the sensor size is the ultimate 'choke point' and will determine overall image quality. It was also in my mind to look at the tiny Olympus E-420 DSLR with it's compact pancake lens that might just be 'pocketable'. I researched the three cameras and to compare such technicalities as sensor performance, colour depth, dynamic range and low light ISO etc, I looked at the DXO Laboratories website, a good source of information. Here you can compare most models side-by-side and I grabbed the following screen comparison:
Having done my research and my thinking, looked at the reviews and the above charts I decided to plump for the E-420 Pancake Kit IF I could find one for a price comparable with the two compacts. It just so happened that I found an E-420 & Pancake Kit for a price much less than either of the alternatives to potentially become my 'pocket' digi-cam even though it is a DSLR (I'd suggest you shop around). With the 25mm Pancake fitted, I agree, it is larger than the LX3 but not much over the G10 size. Its advantages are larger sensor, better higher ISO performance and (when necessary) the benefit of interchangeable lenses. In the shop I tried the E-420 with its Pancake lens installed to find it fits snugly into a loose jacket pocket. E-420 SET UP Having made the decision I acquired the E-420. While setting it up for general use I looked on my friend Andrzej Wrotniak's website to see if he had any recommendations to find nothing E-420 specific. He does offer suggestions for the E-410/510 in an article here based on extensive use of his E-510, but the E-System menu system has changed considerably since and is now more refined and extensive in its structure, layout and content. So, I decided to notate my set-up choices and produce an article for this website that might prove useful to my readers. In fact the E-420 customization is quite remarkable for an 'entry' level machine and I believe deserves some thought, study and consideration. Let's go through the 5 MENU selection screens individually with suggestions/comments following each heading.
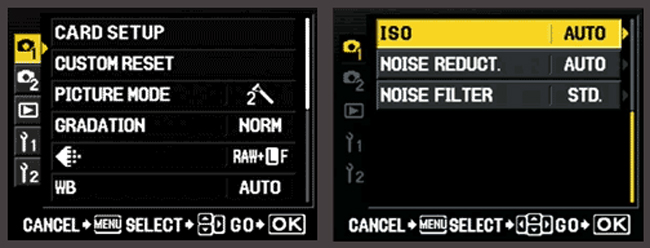
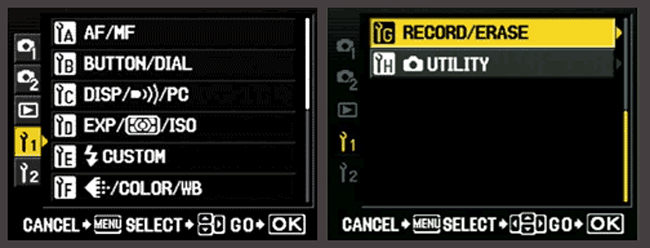
MENU - CAMERA 1
CARD SETUP (CF/xD; All erase, format) dependent on card selected (see SPANNER 2, choice 2) If you use one card only Compact Flash (CF) or xD, the machine simply recognises which slot is occupied. If you use both you can choose which one will be used first by selecting CF or xD in SPANNER 2, Choice 2. Card Setup allows you to delete or format whichever card is given preference.
CUSTOM RESET (Reset, reset 1, reset 2) - reset to defaults or to the settings of your choice (MyMode) Of all the menu options this is the most confusing yet potentially the most useful. Simply it gives you the option to store 2 sets of your preferences and be able to restore the camera to all factory defaults. Here you can setup 2 restorable settings with various choices from most of the E-420's menu/settings. Resets only work in modes P, A, S, & M. There are three resets: RESET that restores the factory default; and RESET 1 & RESET 2 that can be used to store two sets of the users preferred settings. If the selection is greyed out the camera is in 'AUTO' or 'SCENE' mode; change the mode dial to P, A, S, or M. HOW TO USE: In the Custom Reset Setting option press the right arrow button. A box lights that shows: RESET RESET 1 | NO DATA RESET 2 | NO DATA If there are already recorded settings the slot will read SET rather than NO DATA; this means customization has ocurred. RESET By default the top slot is highlighted. If you press OK a simple YES/NO box pops up. YES will restore the camera to factory default; NO will do nothing but return you to the MENU. A factory reset does not over-write the contents of RESET 1 or 2. To store your preferred settings leave this menu item now and set up your camera to reflect your first set of preferences. You can find the 43 customizable camera settings in the camera manual Chapter 13, page 126. Set up the camera with your fisrt set of preferred options then go to: RESET 1 or 2 Select RESET 1 or RESET 2. If the slot already shows 'SET' you can clear past custom settings by pressing the right > and then selecting RESET. The camera will now show NO DATA. Now highlight SET and press OK. The camera will remember your stored settings in each of the two slots. IMPORTANT: Setting and resetting a slot are done without the any further YES/NO box. OBSERVATIONS: This is a very clumsy and confusing interface and you will need to practice it several times. But this feature is useful if (say) you usually shoot in A mode with certain applied over-rides and then in M mode (for macro work for example) with a different set of preferred options. It would be useful if the camera could tell the user which set of preferences were going to be used on start-up. As it is the user has to check in the menu.
PICTURE MODE: Vivid, Natural, Muted, Portrait, Monotone There are five picture modes each offering adjustable profiles, should you wish to alter them. Each of the four colour modes offers adjustable parameters -2 -1 0 +1 +2 in each of contrast, sharpness and saturation whereas the Monotone mode offers adjustable parameters of contrast and sharpness plus a B&W filter (neutral, yellow, orange, red, green that simulate attached filters with B&W film) and a Picture Tone (neutral, sepia, blue, purple and green over-hues). You are offered this choice so you can simulate the effects of differing films you might have used in the past by adjusting the parameters. Or you can simply refer to them as they are - Vivid, Natural, and Muted, Portrait and Monotone each with either its own default or your specified combination of contrast, sharpness, and saturation to suit your expectations The camera remembers your imposed settings even through a camera reset to factory default. Alternatively you can register your choices within a data set (Reset 1 or 2). As Andrzej Wrotniak discovered the designers of the Picture Modes applied their own settings to each mode before setting those levels as factory default so that any overrides you subsequently apply will be applied in addition. This means that even with all three settings at the factory default, various modes will differ in applied levels of contrast, sharpness, and/or saturation. Changes made to the Picture Modes are a matter of your personal taste but the default settings reflect what is generally held to produce acceptable images in each of the five modes. If you choose to alter these settings my advice is to do so judiciously or your results may look over-done. Lowering the contrast settings will marginally extend the upper limits of the sensors Dynamic Range but if reduced too much will lead to flat looking images. Until you gain some experience leave this setting on default or at most -1.
GRADATION: Auto, Normal, High key, Low key Gradation works with jpg's only; it does not apply itself to RAW data. Gradation is a combination of very slight exposure compensation plus manipulation of the tonal curve when the jpg is produced in-camera. What it does is manipulate the highlight and shadow areas of the image. Here's my best description of each setting: NORMAL - No (or very little and/or subtle) effect on output. AUTO - As indicated the automatic application of slight exposure compensation to protect the highlights and gentle lifting of the shadows in processing. The result of AUTO setting at base ISO to ISO400 is acceptable; over ISO400 leads to heightened noise in the shadow areas to the point where it is very obvious. I'd recommend you use AUTO with care. HIGH KEY - Application of over compensation and additional processing to accentuate the highlit areas of the image. Can be effective when photographing brightly lit subjects in bright conditions. You can achieve the same results with the compensation button by applying +1.0EV. LOW KEY - The opposite of the above and useful when photographing primarily dark subjects in darkened conditions. You can achieve the same results with the compensation button by applying -1.0EV. OBSERVATIONS: Be wary of gradation especially if you shoot only jpg as once gradadtion is applied it cannot be undone. Unless you are aiming for a special effect avoid using HIGH/LOW KEY settings. AUTO works well between ISO100 - ISO400 and can help where there is high contrast areas such as lots of brightly lit areas and deep shadows but it comes with a price - more noise. Additional noise occurs in the darker areas of the image where the in-camera processing has 'lifted' the tonal curve of the darker areas accentuating the noise level. On balance I'd recommend you leave this set to NORMAL (which is effectively OFF). You can make just as good adjustments yourself in post-processing. Many users, including myself, have made the mistake of confusing AUTO and NORMAL modes. Unless you are sure you want the camera to apply gradation make sure you set it to NORMAL.
IMAGE QUALITY: RAW; RAW & JPG; JPG size & compression customizable This determines the size, quality and compression of your images and, ultimately, how many images you can store on your card. Olympus have moved to a new system of choice: RAW, Large, Medium and Small with further classification of dimention in pixels with a further layer of compression resulting in Super Fine, Fine, Normal, Base. The RAW image is the whole image data off the sensor compressed losslessly into an ORF (Olympus Raw File). JPG images are subject to overall size, dimention and compression determined by the user. Additionally you may also specify that the camera records RAW + a predetermined size of JPG. The choice here is between RAW, RAW + JPG (Fine & Normal) and JPG (Fine & Normal) only. Later in the camera set-up you can determine some of the storage parameters and compression ratios that range between 1/2.7, 1/4, 1/8, 1/12 for each size of stored image. NOTE ABOUT FILE SIZE & COMPRESSION RATIOS: As a DSLR user I'm assuming you want to get the best image quality (IQ) from your E-420 as possible, otherwise you'd still be using a compact. That being so then you will select either RAW or Super fine JPG as your basic choice. (I'm not going to enter the RAW vs JPG debate). RAW files come with their own lossless compression over which the user has no control. JPG's have four compression ratios to choose from; non of them are lossless. Each time you re-write a JPG there is, theoretically, some loss of fine detail because the data is compressed and the tighter it is compressed the higher is this detail loss. When you compress a JPG too much the data loss can be seen in the image as artifacts, and we want to avoid artifacts at all cost. For all your JPG images always select the lowest compression ratio - 1/2.7. If you are desperate for memory space then select 1/4 but no higher. With memory so cheap these days it's hard to see why anyone would want to skimp on IQ (but there may be times such as on holiday when you are taking more images than you anticipated). OBSERVATIONS: Much depends on personal preference. I rarely use RAW but chose to exploit the excellent JPG engine Olympus offers in-camera and keep post processing to a minimum, so my images are recorded in LARGE Super Fine JPG at the lowest compression of 1/2.7. When I choose to record the RAW data I set RAW + LSF JPG. There is an argument that memory (flash cards) is currently very cheap and therefore not a constraint. While this is true (hence choosing the highest resolution and lowest compression of JPG) RAW data is larger, takes up more space on your memory card and hard drive and needs to be processed into a JPG anyway. On the other hand many class RAW data as the digital negative which should be kept ad-infinitum to take advantage of improvements in RAW processing software as it progresses. The choice is yours.
WHITE BALANCE: Auto, Sunlight, Shade, Cloudy, Tungsten, White Fluorescent, Neutral White Fluorescent, Daylight Fluorescent, One-Touch, Custom White Balance - Color Temperature Colour balance is applied to the JPG image but not the RAW file. If you are a JPG shooter then this section may be of interest to you. If you choose the RAW road then this section is irrelevant as you can apply whatever colour temperature you wish to your image during post-processing. This setting allows the user to override each of the factory WB (colour temperature) presets by altering the red/blue and green/magenta channels to their liking. The camera will remember each override and will apply it when that paticular preset is chosen. OBSERVATIONS: Don't. Unless you are very experienced in colour temperatures leave well alone. The design physicists at Olympus have determined the best possible presets for our use. You also have a 'Custom White Balance' available to setup for a specific set of circumstances. Tweaking the WB setting is quite unnecessary.
ISO SENSITIVITY: Auto, 100, 200, 400, 800, 1600 This setting determines how sensitive the camera sensor is to light - the higher the value the more sensitive. Generally higher ISOs lead to increased noise. Olympus sensors have a reputation for producing more 'noise' than others due to the slightly smaller sensor size employed, leading to greater photosite density and increased signal to noise ratio. However, the physicists have worked progressively to reduce the effects of noise in your images. For most 'normal' photography I leave ISO at 100 increasing it when conditions dictate (dismal light or when higher shutter speeds needed). OBSERVATIONS: I'm happy with ISO up to 800. 1600 produces too much noise for me. However, some folks like the 'grainy' look of noisy images; it reminds them of high speed film. There are many softwares that reduce noise in images. Personally I stick to the lower settings and avoid the problem.
NOISE REDUCTION: On, Off, Auto (long exposures only) This occurs only when an exposure of over 4 seconds is taken. When this happens the cameras software takes over and subtracts a dark frame from the image taken, thus reducing/eliminating noise generated by the sensor warming up during the long exposure. Andrzej Wrotniak describes this as 'static noise reduction'. OBSERVATIONS: I'm happy to leave this setting ON. Nothing happens unless the exposure is a long one. Unless you do a lot of long exposure (astronomy) stuff and want to 'stack' your images it will do no harm. When left on it does not affect any other settings like 'Sequential Drive' so does not intefere with the cameras normal operation.
NOISE FILTER: Off, Low, Standard, High (determines noise reduction applied to images) Unlike noise reduction the noise filter is always active when enabled. It is designed to remove random or non-static noise during the processing of the JPG image. The filter settings are by their nature, progressive and agressive, leading to more noise reduction (and therefore loss of detail) the higher it is set. Over the years I have examined many images taken with varying noise filter settings and conclude only the lowest settings of OFF and LOW should be used. (I am convinced that OFF means VERY LOW). OBSERVATIONS: Set to OFF for 'stealth' (not admitted) noise reduction or LOW for acceptable results.
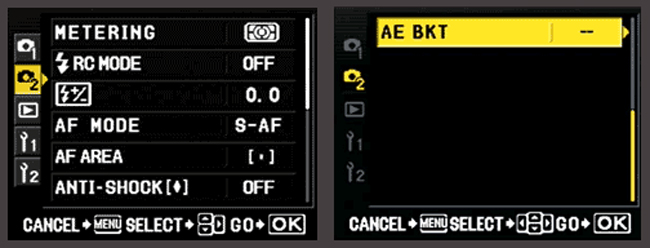
MENU - CAMERA 2
Metering: ESP+AF, ESP, CW, Spot, Highlight Spot, Shadow Spot There may seem to be quite a few choices here but fundamentally it boils down to three; ESP (Electro Selective Pattern) which divides the scene up into many parts and calculates the correct exposure over the scene; CW (centre weighted) which gives preference to the central part of the scene with less preference away from the centre spot and ESP+AF which offers the same accuarte metering as ESP but with a weighting given to the auto-focus area. The remaining options are for special circumstances where you would simply chose them from the menu, not as your primary set-up. Spot metering is for those conditions where your subject alone requires accurate metering and highlight & shadow spot are simply a spot meter reading with positive or negative compensation applied as well. OBSERVATIONS: After much trial and error I've settled into ESP and I find this gives the most consistent results.
Flash RC mode: On/Off (controls wireless flashes FL36R/50R) This setting allows you to remotely use multiple compatible (RC) flash units that can be controlled and adjusted from the camera menu. If turned ON the camera menu will always request the flash settings to be input; leave switched OFF. OBSERVATIONS: Most folks will not be using such a set up so leave this set to OFF. When using such a setup you will need to study the flash manual to set up individual flashes for the effect you desire.
Flash exposure compensation: -3EV to +3EV by 1/3EV increments This allows you to increase/decrease the base setting (power) of your flash. If you find the on-board flash tends to burn out your subject then set the compensation lower than 0 and vice versa. However, remember you may also chose to have any flash compensation applied to any ordinary compensation you impose, or not (see WRENCH1/E); a combination may well throw your exposure off so be wary. OBSERVATIONS: Always try any flash compensation along side any ordinary exposure compensation you have dialled in and then lock the setting in WRENCH 1/E. In normal circumstances leave the flash compensation set to 0 unless the flash is too strong/weak; then compensate.
AF mode: Single AF, Cont. AF, Manual focus, Single AF + MF, Cont AF + MF Here the choice is between Single AF, Continuous AF, and Manual Focus with two more modes, S-AF+MF and C-AF+MF that use a combination of AF and MF. Single AF is probably the best choice because it satisfies most situations. But if your subject is moving you might need to select the C-AF tab. The hybrid settings of S-AF+MF and C-AF+MF are meant for use when the camera requires assistance by the photographer for fine tune focus. Because most Olympus 4/3rds lenses are fly by wire (focus ring is electronically controlled) the 'manual focus' element of focus needs to be enabled through this setting. Other lenses like the Sigma 30mm x 1.4 and the new ZD12-60 have a manual focus ring so this setting is obsolete for these units. OBSERVATIONS: I set all my cameras to S-AF.
AF area: Centre, Left, Right, All Simple choice of which AF point you wish to use; or all. The centre point is sensitive to both vertical and horizontal plane the outer two are horizontal only. It makes sense to use the most sensitive AF point. OBSERVATIONS Set to centre point as the default.
Anti-shock: Off, 1 - 30 secs selectable (Olympus' Mirror lock Up) Many folks are confused by this setting. Anti-Shock = mirror lock. Use this setting if you wish to stop mirror vibrations being transferred through the body to your exposure. Essential for tripod work but little else. If you ever enable this setting for tripod work make sure you disable it immediately otherwise you will wonder what has happened to your camera as there will be an unwanted delay from pressing the shutter to taking the exposure. As a reminder anti-shock is denoted by a solid diamond shown in the drive mode icon box in the super control panel (though you may well miss it!). OBSERVATIONS: As default set this to OFF. If you wish to use this feature when taking exposures off a tripod lengthen the delay according to the length of the lens. Longer lenses are heavier and it takes longer for shock waves to travel their length. For a normal lens use 2 seconds; for 50mm and above use 4 seconds; longer than 200mm use 6 seconds.
AE bracketing: Off, 3 frames/0.3EV, 3 frames/0.7EV, 3 frames/1.0EV A very useful feature providing three frames with your choice of applied compensation. Use when critical exposure is required or when undertaking HDR. Camera takes first shot normal, second - EV, third + EV. You have to press the shutter 3 times or set to multiple exposure and count three. OBSERVATIONS: For normal photography set to OFF.
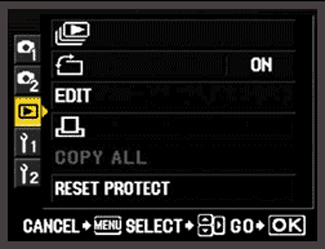
MENU - REVIEW
None of these features are required to set up the E-420; for further details please read the manual.
Slideshow: 1, 4, 9, 16, 25, 49, 100 frames (selectable number of screen images shown) On/Off: (change captured portrait orientation) Choices over these: RAW Data Edit and JPEG edit: Shadow Adjustment, Redeye Fix, Crop, B&W, Sepia, Saturation, Resize DPOF print marking: One, All Copies from one memory card to another (xD to CF or vise versa) On/Off
MENU - SPANNER 1
(SPANNER 1 - A) AF/MF: AF illuminator: On/Off) Where there is insufficient light for accurate auto-focus you can enable/disable the auto-focus assist light. This light is generated by either the on-board flash when raised that emits a burst (strobe) of low light or if using an external Olympus flash (FL36/50 or FL36R/50R) which emits a beam of red light with a striped pattern on which the AF can focus. If enabled the internal flash has to be raised, or an external flash fitted, to work. Some users find the strobe light offensive to their subject if the flash is popped up. The AF assist light needs to be disabled if you are using any slave controlled studio lights as the strobe will trigger them too early. OBSERVATIONS: I set my AF illuminator to ON, but the AUTO POP UP to OFF in WRENCH 1/E
Focus ring: Counterclockwise, Clockwise (direction of Focus By Wire focus rings) Here you may chose the direction you turn the manual focusing ring on Olympus ZD lenses when manually focusing. It is throw back to film days when different manufacturers had their lenses turn different ways to achieve infinity. OBSERVATIONS: Entirely up to you; Legacy OM lenses turn anti-clockwise for infinity.
Reset lens: On/Off (resets lens to infinity when camera turned off) When enabled the lens will reset to infinity on camera shut down. A sensible feature that is designed to protect the lens barrel. OBSERVATIONS: Leave this set to ON.
Bulb focusing: On/Off (selectable focus during bulb exposure) On occasions when you use the BULB feature (long exposure) you can chose to enable/disable any manual focus during the exposure period. (Will not work with Sigma 30mm x 1.4 and presumably ZD12-60mm). OBSERVATIONS: I can't recall ever wanting to alter focus during a bulb exposure so I keep this set to OFF.
Live view AF: AF sensor, Hybrid AF, Imager AF (see above) When using the LCD panel for composition you can determine which sensor the camera uses to achieve its AF. If you are using Contrast Detect capable lenses (14-42mm/40-150 Mkll/25mm pancake/14-54 Mkll) set this to Imager AF and auto-focus is achieved directly from the imaging sensor (LMOS). Using any other lens means the camera will confirm AF from the Phase Detect sensor behind the mirror, thus slowing the process of AF. Whichever setting you choose is over-ridden by the camera if it is NOT fitted with a CD AF lens - it will default to Hybrid AF in any case. OBSERVATIONS: Set to Imager AF as default; the camera will override this as necessary.
(SPANNER 1 - B) BUTTON/DIAL: Dial: you may select what the command dial(s) control: (a) Program mode: Program Shift, Exposure Comp (b) Aperture priority mode: Aperture, Exposure Comp (c) Shutter priority mode: Shutter speed, Exposure comp (d) Manual mode: Shutter Speed, Aperture) The E-420 has only one control dial. The above choices select exactly what the control dial changes in each of the four modes P, A, S, M. OBSERVATIONS: These settings reflect personal preference. It is less of an imperative when the camera has only one dial. Much depends on the type of photography you do. I have left these settings on factory default.
Dial direction: Dial 1 (selectable for effect of turning the dial L or R) As indicated determines how the selected feature reacts when the dial is turned. OBSERVATIONS: I have the dial set to turn to the right. This means that in A mode when I turn the dial away from my eye (to the right) the aperture closes and vice versa.
AE/AF lock viz: (a) S-AF: Mode 1, 2, 3 (b) C-AF: Mode 1, 2, 3, 4 (c) MF: Mode 1, 2, 3 Here you determine how the AE and AF functions respond when the shutter button and/or the AEL/AFL button (just right of the viewfinder) are pressed. A choice is offered for each focus mode available; S-AF, C-AF and MF. For each focus mode is offered several pre-determined sequences. This setting does not change focus modes, only how the buttons react in each focus mode. The E-420 is my 6th E-System camera and I have studied and played with every AE/AF Lock combination on offer and I conclude that unless you have an over-riding need to change the pre-sets, stick with the factory defaults as they are very logical. OBSERVATIONS: Leave the setting on default unless you know exactly what you want in a particular focus mode.
AE/AF lock memory: On/Off (makes button sticky) I struggle with this feature; when I use it in the OFF mode, I wish it were a 'sticky' button. But if I make it sticky by switching it to ON then forget to toggle it off after I've taken the shot it can spoil the next exposure because the previous settings are 'locked' into the camera. OBSERVATIONS: On balance I agree with Andrzej Wrotniak when he insists on having the feature set to OFF. For those occasions when you need to lock the settings - such as putting together a panorama - enable it for that period only, then switch it OFF.
Function button (1): Face Detection, Preview, Live Preview, One-touch WB, Test Picture, Off (programmable button) Allows you to set the function of the Fn Button (left on the 4-way controller). This is entirely a matter of choice for the user. OBSERVATIONS: Personally I have it set to PREVIEW.
Function button (2): Drive/Remote/Self timer, ISO, Metering, WB, AF Mode, AF Area Allows you to set the function of the DRIVE button (top plate left shoulder). This is entirely a matter of choice for the user. OBSERVATIONS: Personally I leave it set to DRIVE as I use the remote control quite a lot when testing. I would guess the most popular choice would be ISO.
(SPANNER 1 - C) DISPLAY/SOUND/PC: Beep: On/Off The 'beep' on the E-420 is pretty quiet and cannot be heard unless the camera is close to the face. I set it to ON. Sleep: Off, 1, 3, 5, 10 mins For your battery's sake set to 1 Min. Backlit LCD: 8 sec, 30 sec, 1 min, hold For your battery's sake set to 8 secs. USB mode: Auto: Storage, MTP, Control, Easy PictBridge, Custom PictBridge Unless you regularly use PictBridge/Custom PictBridge set to AUTO and leave it to the camera to determine. Live view boost: On/Off (boosts screen brightness in low light in live view) If enabled this will set the 'gain' up in Live View in dismal conditions. In high gain situations the monitor tends to mono. I leave this set to OFF. Face detection: On/Off (in live view mode) Depends if you use/will use face detection. If so then set to ON. Frame Assist: Off/Grid/Golden Section/Scale In Live View this allows you to choose the pattern of the overlay: GRID = overlays 24 squares in a 6x4 pattern; GOLDEN SECTION = similar to 'rule of thirds' pattern but slightly centred; SCALE = a 'cross hair' type target with marked axes. OBSERVATIONS: This is quite a nice feature in Live View. The GRID is the most useful as this can be used as a basic level guage too. Unfortunately it's only available in LV.
(SPANNER 1 - D) EXPOSURE/METERING/ISO: ISO Auto set: 100 - 1600 (selectable top limit of Auto ISO) This allows you to set the highest ISO value the camera can select when the ISO is set to Auto. OBSERVATIONS: If you normally allow the camera to set ISO (ie ISO=AUTO) it is advisable to restrict its highest setting to ISO400 to avoid undue noise at the highest ISO setting of 1600. I have this set to ISO400 in case I accidentally set the camera to AUTO ISO; this setting would avoid high ISO noise. Moral? Do not set the camera to ISO=AUTO in CAMERA 1 menu; choose your ISO to suit circumstances. ISO Auto: P/A/S/All (when auto ISO is available) For some strange reason Olympus lets you to determine in which modes you allow AUTO ISO to be available to the camera, either in P, A, & S only, or ALL modes (including manual mode). OBSERVATIONS: Do not set AUTO ISO. If you do, set this parameter to P/A/S to protect use in fully manual mode. AEL metering: AUTO, ESP, CW, Spot, Spot Highlight, Spot shadow This allows you to determine which metering pattern will be used when the exposure is locked with the [AEL/AFL] button NOTE: not by the usual half-press of the shutter. Your choices are: AUTO - I take this to mean the metering pattern you have chosen for NON locked situations. CW - Meter will always chose centre weighted. SPOT - Meter will always chose spot metering. HIGHLIGHT - Meter will alwys chose highlight metering. SHADOW - Meter will always chose shadow metering. OBSERVATIONS: I'm drawn to recommending either AUTO or SPOT. Much depends on the conditions and circumstances in which you are using AEL Metering in locked mode. If for example you are locking the metering for a panorama it makes sense to have the metering reflect the cameras original setting and not change to another pattern. But if you are shooting in a studio with special effects it may be wise to allow the camera to change to SPOT when you lock the AEL button. I've left mine on AUTO. Bulb timer: 1, 2, 4, 8, 15, 20, 25, 30 mins (selectable time for bulb mode) Set this as you need it. Otherwise leave it set at default, which is 8 mins.
(SPANNER 1 - E) FLASH CUSTOM: Flash exp comp + exp comp: On/Off (selectable flash exposure compensation linked to exposure compensation) This setting determines if any flash compensation is applied with or without any picture exposure compensation you have set. ON means the flash compensation is added to the picture exposure compensation, while OFF means it is not. OBSERVATIONS: It makes sense to leave this set to ON as this offers you more control over the output than compensation with the flash only. Auto pop-up: On/Off (selectable if flash pops up when required in auto or scene mode) If you regularly use AUTO or SCENE modes then it makes sense to have this set to ON. If you use P, A, S or M modes more frequently you will do better to have this set to OFF providing you set the main flash mode to ALWAYS ON in the Super Conrol Panel. OBSERVATIONS: For those wishing to take control of their camera and use the four standard modes P, A, S or M the best configuration is to set the Pop-Up to OFF but the flash set to ALWAYS ON. This eliminates those annoying bursts of flash when the camera is using the flash as an AF assist light too leaving you to determine when you want to use the flash for either purpose.
(SPANNER 1 - F) FILE/COLOUR/WB: All white balance compensation: Choices to set: All set: -7 to +7; and All reset If you need to fine tune the white balance of the camera you can do so in both the red and green channels and if you mess it up there is a reset available. Unless you sre experienced with WB, I suggest you leave this alone. Colour space: sRGB or AdobeRGB I believe there are some advantages to AdobeRGB but you need to know they suit your colour profiles/processing/workflow. If you do not have this knowledge leave this set to sRGB - I do! Image quality set: Large/Normal/Small, Superfine/fine/normal/basic (selectable size and compression) If you are a JPG shooter and with the price of memory (CF cards) getting cheaper there's little reason other than computer processing and HDD space to capture your images in anything other than highest resolution/lowest compression ratio. OBSERVATIONS: Set File 1 to Large/SuperFine and File 2 to Large/Normal. These settings will be reflected when you access the FILE settings in the CAMERA menu 1. Unless you have some overwhelming desire for reduced size or increased compression take advantage of the choices Olympus allows you for the best possible files from your camera. Pixel count: (selectable resolution for following sizes): Middle: 3200 x 2400, 2560 x 1920, 1600 x 1200; Small: 1280 x 960, 1024 x 768, 640 x 480 This allows you to set the resolution for the Middle and Small files. As you are going to use only the best resolution files you can ignore this setting though it might be wise to set Middle to 3200x2400 and Small to 1280x960 but NEVER select them as your choice of file size.
(SPANNER 1 - G) RECORD/ERASE: RAW+JPEG erase: JPEG, RAW, RAW+JPEG (decide what is removed when you delete a RAW+JPEG photo) This selection only applies if you save your images in two formats (ORF and JPEG) consecutively. If so, and when you wish to delete the image(s) while being viewed, on pressing the DELETE button the camera will delete either one or the other or both formats together of the image, depending how you set this menu choice. I occasionally use RAW+JPEG so I have this set to JPG thus leaving the RAW version. If you never save in dual format then leave this at the default setting of RAW+JPG. File name: Auto, Reset Here you may set how the file number is recorded when taking an image either when starting a fresh sequence or with a new card. In this context the meaning of RESET = starts from new i.e. 0001; or AUTO = continues from the last recognisable sequence. OBSERVATIONS: This choice can lead to confusion. If you set to RESET there is the risk the camera may mark two files with the same number if two cards are used on the same day - not good. ALWAYS set this to AUTO. dpi setting: Auto, Custom (allows setting of dpi) Of all the terminology associated with digital imaging DPI and PPI are the most confusing. Leave this setting on AUTO.
(SPANNER 1 - H) UTILITY: Cleaning mode: mirror lock up for manual sensor cleaning Should you ever need to clean the sensor (unlikely as Olympus' SSWF cleaner is the most effective preventative measure designed) this selection allows you access to the delicate membrane in front of the sensor. To use remove the lens, enter this menu choice and press and press START, a screen appears telling you to use the shutter button to start the process. On pressing the shutter the camera flips up the mirror and opens the shutter giving you access. When finished the process is reversed by powering off. OBSERVATIONS: Proceed with great care for these reasons: Should the battery deplete while you are cleaning, the shutter will close and the mirror will flip back down resulting in damage to one or both. If there are foreign objects stuck to the membrane that cannot be dislodged by repeated operation of the SSWF mechanism I'd suggest they may well be beyond removal by DIY methods at home. Do not be tempted to use canned compressed air as it will damage the membrane. Sensor/membrane cleaning requires specialist tools and materials. Play safe and entrust this work to Olympus technicians; if they make a mistake you are covered.
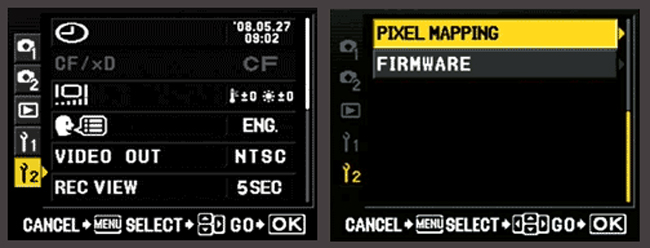
MENU - SPANNER 2:
Date/time: (to set) As suggested to set the date and time, an essential function for correct tagging of your images. If left unset,the camera will remind you every time it is powered on. Once set you can forget about it unless the battery is left out of the camera for several days. OBSERVATIONS: Daylight Savings: are not automatic. If you want the camera time to reflect your time zone you will have to change these settings each Spring and Autumn. I don't bother. CF/xD: (which card slot to use) Why anyone would choose xD over CF is a mystery. For anyone using xD please read this article here. xD are fit only for emergency use, as a transfer receptacle to free up space on your CF card. CF cards are faster with larger capacities, affordable, well proven and still in development. xD are a throw back from SmartMedia, slow with limited capacity (2GB max) and no longer in development. Rant over! Set this to reflect the card you use. If you use both cards you can change the selection here or from the Super Control Panel. Edit filename: (change file naming system) with choices for AdobeRGB: Off, A-Z, 0-9; and sRGB: Off, A-Z, 0-9 Here you can partially modify the way Olympus name the files from the camera. You need to understand how the existing naming convention works and how the file character can be changed. It is quite involved and, in my opinion, hardly worth the bother and best left alone. However, if you are determined to change the file names I suggest you refer to your manual. Most folk have their own diciplines for naming and storing their images when they doenload them to their PC/laptop so this will take precedence. LCD brightness: Choices over Brightness: -7 to +7 and Color balance: -7 to +7 Here you can change LCD panel settings in both brightness and colour temperature. The only alteration I undertook was a single point upwards in the brightness range. This is personal preference. Language: Selection of pre-installed plus further one downloadable Wherever your camera was bought will select the choice of language(s) available for the interface. A further one language can be downloaded via Olympus Master software from the Olympus corporate website. Video out: NTSC, PAL The choice is NTSC or PAL, depending on your country. Rec View: Off, Auto play, 1 - 20 secs (image review; auto play option enters playback mode after image recorded) This is the time in seconds the 'just taken' image is displayed on the LCD and is adjustable. In AUTO mode you can instantly scroll through the exposure information (INFO button) and enlarge the image without having to press the review button. OBSERVATION: Nothing ever comes for nothing! With Rec View set to AUTO, using the camera on tripod and using the remote to trip the shutter (for all my testing sessions), I have to touch the shutter button to close the Rec View screen before the remote will work. Over time I have got used to this, but you may find it annoying. OBSERVATIONS: Personally, regardless of the above, I have Rec-View set to AUTO; for me this saves time. Pixel mapping: (Re-maps/maps out bad pixels on the sensor) Now and then you may notice a bad pixel in your images. Pixel mapping can rid the sensor of these annoying aberrations. Do not over-use; once every three/six months is sufficient or as and when required. Firmware: (shows current firmware version of body and attached lens) Will display the firmware version for the body, lens, and external flash (when mounted).
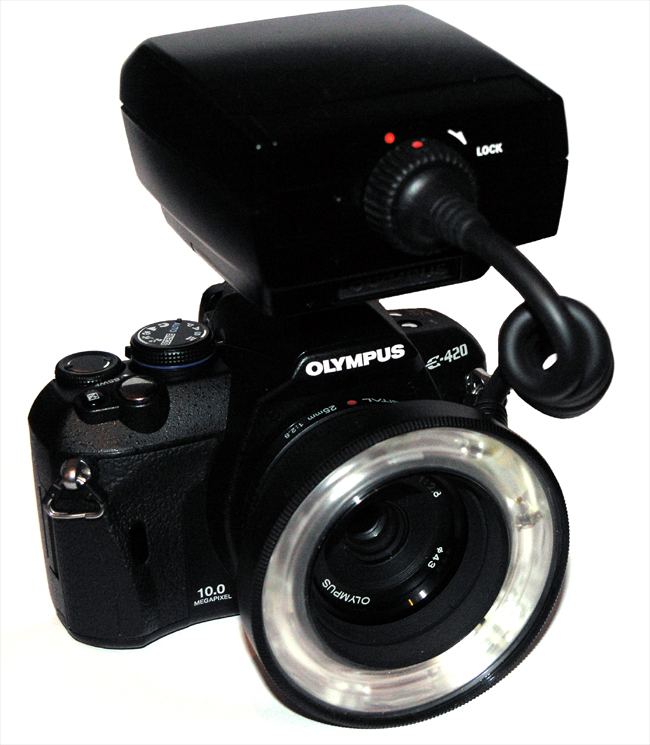
SOME USEFUL FACTS, TIPS & ADDITIONS After a few weeks of non-intensive use I have added a few minor items to my E-420 and bring to your attention some points you may/may not already know which may make your camera experience more enjoyable. ME-1 MAGNIFIER Being an E-3 user I noted that after a few days with the E-420 I missed the larger and clearer screen of the bigger camera. I bought an Olympus ME-1 for the E-420 and it has made a substantial difference, but please note I do not wear glasses. The downside is that you have to cast your eye around the screen to see all the exposure information on the right-hand side and that can be a small nuisance. The ME-1 is a bit expensive in UK at £39 + postage but has made the viewfinder experience somewhat better. Providing you don't wear glasses I'd recommend it. LENS CAP for PANCAKE I agree with all previous commentators - the screw in lens cap that comes with the Pancake is eminently loseable! After much searching for a 43mm pinch cap I found one in UK. Email Sylvia's Photographics & Gadgets here. REMOTES RM-1, RM-2 and NON OEM RC-C1 For your information I can report that the E-420 works well with all the available IR remote controllers, including the cheap but better reaching (10m) Chinese copy, the RC-C1. (Olympus remotes work up to 5m only). The RM-1 and RC-C1 will operate the shutter in BULB mode using the Wide (to open) and Tele (to close) buttons - do not use the 'S' button. Remember in BULB mode your exposure will be longer than 4 seconds and will trip the Noise Reduction in-camera, leading to long processing and write-time. MACRO FLASH I have used my Olympus OM Macro flashes T8, T10 and T28 on the E-420 to good effect. The camera is small and light making it a good choice for macro tripod work. With either ZD35mm or ZD50mm and a stepping ring I can mount any of the OM Macro flash units and after 2 or 3 trial shots can have the exposure quickly calculated. To read how I adapted my system see my article here. That article was written with the E-3 in mind but it works fine with the E-420 though the maximum shutter speed you can obtain without shutter vignette is 1/320th. MACRO FLASH WITH PANCAKE Having just found my 43-55mm stepping ring (from my C5050 converter days) I can now use the 25mm Pancake fitted with the T10 ring flash for general 'close-up' work (not macro). With a close focus of 20cm (8") the Pancake may be a small and lightweight alternative to using either macro lens to avoid the sometimes slow AF lock associated with these lenses due to the long 'travel' of the inner lens tube to obtain true macro magnifications. Personally I enjoy adapting/re-using equipment I already have (and I bet many of you have too) sat in cupboards from earlier days. Having amassed a large selection of OM gear I was disturbed to think that the digital era would make it redundant. The fact that I can use most OM prime lenses and the Macro flash system on the E-series makes this commentator very happy.
CONCLUSION This article arose from setting up and subsequent usage of my own E-420. However, documenting it with my reasons for the various choices made, was an all together longer exercise than I'd anticipated. I would never suggest that these settings are in any way perfect but they will give you a good starting point especially if you are not particularly familiar with Olympus DSLRs and their menu system. I suggest you experiment with some of the more major settings to get the image output you require. You may also wish to read similar articles (just as I did), especially that on setting up the E-410/510 by my good friend Andrzej Wrotniak here.
NOTE: This article seeks nothing other than to inform. Only you can decide what equipment you want/need for your use. I own most of these cameras/lenses, out of my own pocket; I have nothing to gain or lose by publishing this article, photographs, examples or opinion.
|