E-SYSTEM
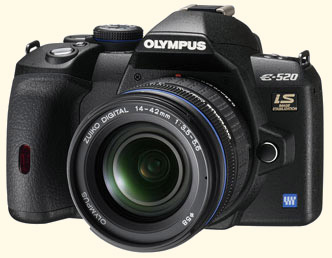
E-520
a review based on a
pre-release camera

|
E-SYSTEM
E-520 a review based on a pre-release camera
|
|
BACKGROUND: I received a review sample of the E-520 on 22nd May 2008 from Olympus UK. The camera has firmware 1.0 on board. I have no idea if the commercial offering will share the same firmware but based on past experience maybe not. I have not been discouraged from posting samples but bear in mind that any posted are from a review camera with early firmware and may not be wholly representative.
HEADLINE FEATURES: * Larger 67mm (2.7") monitor screen (64mm on E-510/E-500) * Improved frame rate for fast shooting - 3.5 fps (3 fps on E-510/E-500) * Improved IS selection now with vertical and horizontal panning (3 modes) * Contrast detect autofocus (certain lenses only) and face detection in LV with any lens * Wireless flash control when used in conjunction with FL36R/50R * Shadow Adjustment Technology that protects highlights and enhances dark areas * Perfect Shot Preview shows you the effects of EV & WB alterations live on the LCD (in LV)
INTRODUCTION: Having opted to wait for the E-3 as my personal camera I did not buy into the E-510 but read with great interest my friend Andrjez Wrotniak's long and detailed appraisal of the camera in his review. I have the E-500 which I consider to be good for its time but does show perhaps too much some of the early Olympus weaknesses such as heightened levels of noise with raised ISO levels. What is important to remember is the E-500 restored the fortunes of Olympus after the relatively poor commercial showing of the E-1 and E-300. (The E-300's flat-topped design was a step too far in the surprisingly conservative tastes of DSLR users who prefer a prism-hump design. Strangely I'm very fond of my E-330 though yet I could not bring myself to buy an E-300 yet the cameras are almost identical! Such is the power of Live View Mode A.) It is natural therefore that the company builds on the E-500's winning concept and design to produce the third iteration of the camera and the 9th Olympus DSLR in just under 5 years.
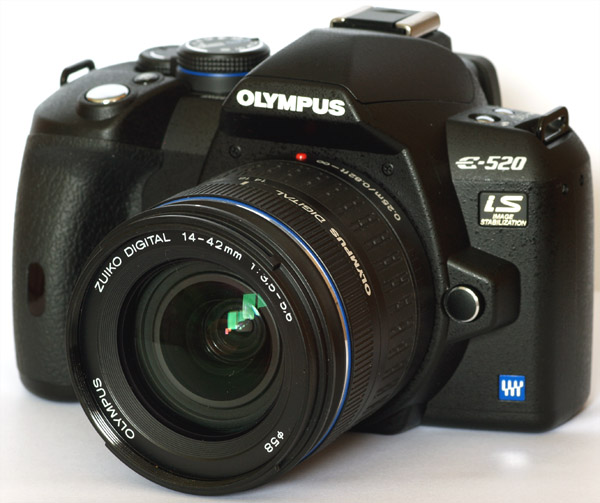
COMPARED TO THE E-500: Being familar with the E-500 I soon felt at home with the E-520. It is fundamentally the same chassis as that which morphed into the E-510 - slightly wider allowing the lens mount to move to a more central position thus providing a small shoulder on the left on which to place dedicated control buttons. The slight downside to this re-arrangement is that one's nose tends to smear the LCD more than with the older E-500. Compared to the E-500 the prism hump under the flash pop-up is larger and must reflect the change from Penta-mirror to Pentaprism though I think the older system is marginally brighter, especially in dismal conditions but the newer solution is slightly more crisp. Also redesigned is the grip shape now housing the infra-red receiver window, moved from top plate of the E-500. All else (externally) appears to be more or less the same. The new smaller flash head is marginally less powerful (GN = 12) than the original E-500 (GN = 13).
COMPARED TO THE E-510: Any differences between the E-510 and the new E-520 are less obvious. Externally all I see different is the colour of the body markings changing from green to blue (to assist those suffering from colour blindness) and the style/finish of the main control wheels that now resemble OM style knobs, being finely serrated for grip with an inset chrome ring in the black plastic, and the increased size of the screen. While on the subject of the screen the E-520 has a new feature of adjustable brightness AND colour temperature; excellent for those fine personal adjustments. The screen is 67mm diagonally, a marginal increase over the 64mm of the E-500/E-510 and has the same dot resolution of 230,000 of the E-510 over the 215,250 of the E-500. The screen is easier to read at acute angles than that of the E-500 and is supposed to facilitate Live View composition from a wide range of angles, but to my mind this does not compare to the moveable screens of either the E-330 or E-3. Still, economies had to be made somewhere, you simply cannot have everything at this price level.
E-520: Weighing in at 475g compared to 460g (E-510) and 435g (E-500) and very little more with the standard ZD14-42mm zoom fitted, the E-520 is easy on the hands and fingers. The 10% increase in weight over the E-500 is due to the Image Stabilization system and larger LCD. Being used to the weight and bulk of the E-3 this camera is refreshingly light and easy to handle. The E-520 takes the 'standard' larger Olympus DSLR battery, the BLM1, that provides plenty of power for the all but the heaviest days shooting (rated in excess of 600 shots). Olympus do not make a battery grip for the camera but I dare bet one will be available from China - OwnUser - soon enough, though I cannot really see the advantage of adding weight and bulk to this class of DSLR. Its attraction is its lightness and good handling.
BODY FINISH & ERGONOMICS: The E-520 is finished in the now standard black 'crackle' type finish over a glass re-inforced plastic & part metal body shell. It has a rubber covered grip with the same rubber material insert on the back plate indent for the right thumb and the camera readily falls to the right hand with the left hand intuitively cupping the base plate and underside of the lens. The controls are easily reached and I note it requires no finger/hand contorsions to operate the mode dial or single control wheel or any of the numerous buttons (unlike the E-3). I note here the two square buttons lying under the selection wheel are just as badly placed as they were in the E-500, being liable to be inadvertently pressed when picking up the camera (especially with a weighty lens in board). This is really the only ergonomic issue I can find. The E-520 enjoys no dust or drip proofing as do few other cameras in this class. It would be expensive to achieve and might add additional size to accommodate the various gaskets. But it does have the famous Olympus SSWF method of cleaning dust from the sensor, still the bane of many other DSLR systems.
SHUTTER, SHUTTER SOUND, FRAME RATE & CF USE: For a mid-range DSLR the shutter speed range is very well specified. From 60 seconds to 1/4000th plus up to 30 minutes in BULB is generous indeed. There are a few imposed shutter limitations in the mode settings; in AUTO & certain shutter SCENE modes there's a limit on slow shutter speed to 2 or 4 secs respectively and it follows no BULB setting. Additionally, of course, if using the camera at high ISO's the prevailing conditions may exceed the top shutter speed recommended by the meter. In this case the speed indicator in the VF flashes. I do not have the E-510 to compare shutter sounds with but the E-500 shutter process is slightly longer than the new model and marginally quieter. It is difficult to describe; the E-500 is a long veeerrsstt - veeerrsstt where the E-520 is a slightly louder, shorter and more metallic clack-click. For sure, they are different shutter mechanisms with the E-520 perhaps not being as well damped as the E-500. Olympus had to increase the shutter speed mechanical process to accommodate the increased frame per second rate from 3fps to 3.5fps and eliminating some damping was one way to resolve this. Any increase of frame rate is always welcome. OK, the 15% increase may on paper be marginal but it is noticable. Personally I think the buffer size and processing speed is just as important, as is the speed of the CF card you choose. I used a 4GB SanDisk Extreme IV CF card in the E-520 and the whole performance of the camera was simply excellent. To see the difference I used an M rated 1GB xD card (why do Olympus bother with these?) and the speed dropped quite dramatically. With the xD card on board I seemed always to be waiting for the red lamp to stop flickering regardless of the cameras settings. If you are seriously considering an E-520 please do not throttle the thing by installing an xD card - instead enjoy the benefit of the cameras internal processing speed by using a decently specified (and genuine) CF card; this way nothing will slow you down. I didn't undertake any formal read/write time tests but in RAW with manual focus the camera would record around 10-11 frames at 3.5fps before I noticed any buffer imposed slow down. In Large Fine jpg the camera seemed happy to fire away without limitation. The E-520 works fine with the RM1 remote providing you enable this in the DRIVE setting. There are 2 settings; instant and 2 seconds. I use the remote a lot when testing, along with tripod and mirror lock-up to ensure vibration free shots. For anyone not familiar with thr RM1 its 'Zoom' buttons control the shutter in BULB mode.
VIEWFINDER: The viewfinder is small but quite bright and offers a 95% coverage with the read-out information to the users right rather than underneath as with E-1 & E-3. Personally I do not like this arrangement but for many users it is of no consequence unless they wear glasses. The camera has an accurate dioptre adjustment and the finder is surrounded with a soft rubber eye-piece. The VF image can be slightly magnified by use of the (optional) ME-1 magnifier that offers a modest increase to x 1.2 size. There is no internal viewfinder shutter so if you need to block off the light entering the camera via its viewfinder you must use the daft piece of black plastic (EP-4) provided which slides into the same notches as the rubber eye-piece or magnifier. This 'shutter' is soon lost, I speak from experience. It is easily resolved with a hat brim/peak or other handy shading device. This is a minor gripe that pertains to most Olympus Prosumer DSLR cameras (not E-1, E-3 or E-330) and for most folks is a non-issue; however the fundamental problem of extraneous light entering the camera through the 'back-door' and skewing the metering is very real and should not be ignored.
AUTO FOCUS & LOW LIGHT PERFORMANCE: The AF targets are restricted to the normal three; centre, left and right with the 'Spot' metering circle central. These are of course selectable via the [---] button below the thumb wheel or via the menu. The normal red dot lights to indicate which AF target is in use but I note the 'beep' that sounds AF confirmation is very quiet and there are times when I simply do not hear it and need to glance right to receive visual confirmation. The AF function is about three times faster than the E-500 (even when fitted with the new generation lenses) and that is a very welcome advance. I'm assuming this advance was seen in the E-510. In dismal conditions the AF struggles for an accurate lock and will now and then inaccurately confirm a focus lock with the green lamp. If it does not lock out it simply traverses through the AF steps looking for a lock but inevitably fails. This is about the same low light performance as the E-500 and other E-cameras such as the E-330 & E-400; it is a restriction you will have to live with or simply attach the FL-36/50 earlier. The E-520 offers full integration with the FL flashes as well providing wireless use with up to 9 'R' flashes for complex lighting. In poor lighting conditions the camera will use a strobe of light from the on-board flash to assist with AF. Many users disable this as it can distract or annoy the subject, but when used with either of the dedicated FL36/50 units the flash itself emits a red beam for AF assist; another good reason to use an external flash.
FOCUSING MODES: The E-520 has the now usual choice of five AF modes; S-AF, C-AF, MF, S-AF+MF, C-AF+MF. Personally I rarely stray from S-AF or S-AF+MF unless I am doing lots of macro work and I either use MF or auto focus is disabled because I am using the spectacular OMZ 90mm Macro (a fully manual lens). I have tried C-AF when shooting birds in the garden, but with little success. This is largely down to me being unfamiliar with the concept. I rarely use it so I don't bother with it (perhaps I should). A word of warning; if you use S-AF+MF for critical live view focus work on the tripod and use the RM1 release, even after you've manually adjusted the focus the AF system will undertake a final AF reading/setting when you press the RM1 button. Use MF only in this situation. (Ask me how I know.)
IMAGE STABILIZATION: In the short period of time I had the camera it was not possible to undertake any serious testing of the IS system. I can say that when taking most of the garden shots you'll see later I selected IS1 when shutter speeds were pretty low and I am more than happy with the results. The IS fitted to the E-520 is the same basic unit as the E-3. I did some testing of that camera some months ago including a section on IS. You can read the results here (or click link to section 6 on the top menu). I concluded that the IS system works but perhaps not delivering the 5 EV stops advantage the maker claims. The E-3 IS system offeres 2 modes, full IS and horizontal panning IS. The E-520 has three IS modes; IS1 that reduces camera shake in both vertical and horizontal use (for most images), IS2 to be used when panning horizontally and IS3 to be used when panning vertically. Demonstrating that body based IS is effective is pretty difficult and most testing methods have been subject to criticism. I'd suggest you read the article written by Andrzej Wrotniak as part of his E-510 review to get a good understanding. You can go to that article here. Having now used two camera with IS (E-520 & E-3) I am convinced this is a really useful additional tool in the cameras armoury to deliver clean shots. The IS system works, without doubt. However, and like Andrzej, I'm not convinced the benefit is quite as great as the advertising material might suggest. Even so there is plenty to suggest that there is a demonstrable gain of around 2-2.5 full stops of EV, and for that I'm very grateful. This EV gain might compensate those who consider the E-520's ISO 1600 performance as too noisy as they can use ISO 400 instead, with IS delivering a shake-free image. SEEING IS WORK: It is possible to demonstrate IS to yourself by mounting a long lens, switching to LV, selecting a target, focusing thereon and pressing OK which magnifies the target 5, 7 or 10x. See how much it is swaying as you try to hold the camera steady. Now press the IS button and select IS 1. The result is (can be) dramatic. This simple procedure, as demonstarted by Olympus technicians, will alay any doubts in your mind that the technology is working.
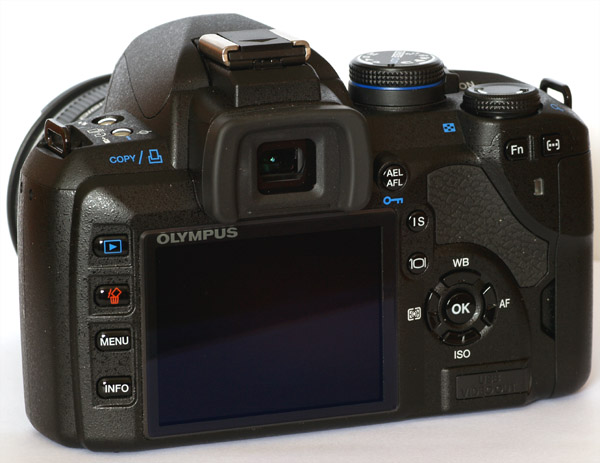
MONITOR: The new camera boasts an increased size of LCD. The back plate and button placement has been redesigned to accommodate the bigger screen which now reaches to almost the base of the camera, not leaving room for the 'HyperCrystal LCD' badge that appeared on the E-500 (hooray). The screen resolution is increased to 230,00 dots and is better to look at than the E-500 by some margin. Whether it is due to increased contrast or a better quality over-screen (the bit that scratches) I'm not sure, but reviewing the images is quite pleasureable providing you don't increase the magnification too much. As with all other Olympus DSLR's if the magnification is increased beyond 7X no more file information is made available, so there is no more detail to be seen at the 10X & 14X settings. But the larger screen does make a difference to the pleasure of owning the E-520. When the monitor is used as the Control Panel its larger size makes the menus easier to read and discern on bright days. During my time with the E-520 there was no occasion where I could not read the back screen, and I was adjusting various parameters most of the time. Even in direct and bright sunlight all I had to do was create a touch of shade with my hand and I could read it all. I certainly cannot do that with most of my other cameras.
LIVE VIEW (LV): Just as with its smaller sibling, the E-420 the E-520 offers Live View (LV) directly from the main sensor (not a separate sensor ala E-330 Mode A). LV is activated by the monitor button on the back of the camera. One press of the button pops up the mirror and the live image is fed to the screen. Compared to my Casio compact the refresh rate of the E-520 is not quite as quick or smooth but it is more than adequate. The main benefits of LV are: (1) the user sees precisely the image about to be captured, (2) there are occasions when it is more convenient or less intrusive to use the camera screen to compose, (3) LV offers a level of familiarity to those coming from the compact world. Three choices for LV operation are offered via the main menu; AF Sensor, Hybrid AF and Imager AF; (earlier iterations of this technology - E-410 and E-3 offered only one method, AF sensor). Remember, regardless of which mode you select, pressing the LV (momitor) button flips up the mirror. AF Sensor: In this mode no AF takes place regardless of half pressing the shutter button. Instead AF is achieved by pressing the AEL/AFL button. Pressing the AEL/AEF button invokes another flip of the mirror to achieve accurate AF via the AF sensor behind the mirror before the user can finally compose and capture. Effectively this involves 2 cycles of the mirror flip, one to enable AF and another to actually capture the image. This is the slowest method of capture using LV. Imager AF (default): The E-520 now boasts this new feature with certain lenses only. In this mode AF is achieved by using an 11 point contrast detect AF system superimposed over the feed from the imaging chip. This allows direct and accurate AF in Live View without the need to further flip the mirror. The user half presses the shutter button and can see AF taking place on the screen. When happy with the composition a full press of the shutter flips the mirror down to capture the image and back up again. This method only involves 1 flip of the mirror. This is the fastest method of capture using LV though this method of AF is not instantaneous and is slightly slower than using the true AF sensor. Hybrid AF: As its name suggests this mode is a mixture of the other two modes. In Hybrid AF an approximate focus is achieved by a half press of the shutter button but true AF is taken from the cameras AF sensor behind the mirror during the mirror flip when the actual image is taken. If you use lenses that do not support contrast detect for integration with LV in Imager AF mode, that is all but the ZD14-42, 40-150 and new 25mm pancake, the camera defaults to Hybrid AF to allow an on screen approximate focus but with the true focus taken from the real AF sensor in the camera body during the exposure. This method too only involves 1 flip of the mirror to capture the image; it is therefore, faster than AF Sensor method. However, none of the above three methods are as fast as a compact because of the physical implications of having a mirror (and shutter) in front of the sensor. Indeed the only DSLR that can compete with the speed of the compact is the E-330 in LV Mode A. All that said LV is a great feature in certain circumstances such as macro, product or tripod work. But in the vast majority of circumstances nothing can replace the real live image seen through a good optical reflex viewfinder and I would always recommend new DSLR users to use the viewfinder over the screen.
FACE DETECTION: Face Detect: The E-520 also facilitates an implementation of 'face detection'. When enabled this feature recognises a face, frames it with a white box and gives preference to both focus and metering within this area thus ensuring the face is perfectly exposed. It is like a very clever spot exposure system. However, while the system is supposed to recognise multiple faces it seemed to struggle with more than two. In fact on occasions it dropped the second face if there was too much movement. As this software is in its early life I dare say improvements will be made over time. I can see this feature will be welcomed by many coming from the compact world, but to me anyway, it is little more than a gimmick (but I'm old fashioned.) The face detect system works in any LV mode and with any lens including manual OM lenses.
SCREEN (MONITOR) INFORMATION in LV: The INFO button assumes a different function in LV. (1) On accessing LV by pressing the MONITOR button, the initial screen is an uninterupted view through the lens but including the AF target. Subsequent presses bring up: (2) AF target + histogram in bottom left of screen, (3) AF target + the green 'target' rectangle that can be moved round the image with the 4-way buttons and then a press of the OK button will enlarge this to 7x or 10x for critical manual focusing, (4) Four small repeating reproductions of the scene with live representations of the effect of under or over compensation +/- 5 stops, and finally by pressing the WB button above the OK button:- (5) Four small repeating reproductions of the scene with live representaions of the effect of changing the white balance across the 11 presets + 1 custom WB (this software is a carry-over from certain compact models and is known as 'Perfect Shot EV or WB Preview'. Certainly these options are very useful in the studio or off the tripod when doing macro work; it is good to know that Olympus are making the most of its LV feature. You can also use the preview button (when enabled) to check DofF etc while using the 'Perfect EV or WB screens in LV mode. If the conditions are too dismal the camera endeavours to turn up the signal (gain) to maintain a decent image on screen but ultimately this will degenerate into a B&W quite grainy image but only on the screen. The captured image will be fine.
SCREEN OVERLAYS IN LV: The E-520 offers 3 pattered overlays in LV mode only; (1) 'Grid' - overlays 20 rectangles; (2) 'Golden Section' - a sort of Rule of Thirds pattern and (3) 'Scale' - a cross hair type pattern. Of course you can switch this feature off and have a clean monitor screen to enjoy. However, I'm rather fond of the grid pattern in landscape photography, as it makes keeping the horizon level much easier. My only observation to this point is that there are so many functions available and so many choices I begin to wonder if we are at the point of saturation.
E-520 MAIN CONTROLS, BUTTONS & ACCESS: The right hand side of the top plate camera sports the 'command' dial with the now familiar MSAP + AUTO as well as Portrait, Landscape, Macro, Sport & Night Portrait short cuts and of course SCENE (modes). Around the command dial is set the camera ON/OFF switch. Behind this and falling to the right thumb is the single selection wheel. The chrome shutter button is at the front top of the grip set in a shallow well with raised sides and immediately behind is the EV compensation button. On the left hand side and beyond the prism/flash hump are two chrome buttons; the front is the flash pop-up and flash control button and behind this is the 'DRIVE' button giving access to single or multiple frames, self timer - 12 or 2 seconds delay and IR control 2 or 0 seconds delay. Moving to the rear right is the 4-way controller with its central OK button and short cut buttons to WB, AF, ISO and metering. I'm a great fan of these 4 direct access buttons and for the life of me do not understand why they are not repeated on all Olympus DSLR's. Their absence from the E-400 (which I own) and other E-4XX series machines to me is a travesty and why they are not dually used on the E-3 I cannot imagine. To the left of the 4-way is the MONITOR (LV) button and above this the Image Stabilization button. Adjacent to the viewfinder is the AEL/AFL button with the viewfinder dioptre above this. Under the selection wheel is a programmable Fn button and the AF target selection button. On the far left of the screen is a vertical row of 4 buttons; at the top is REVIEW, then DELETE, then MENU, then INFO. Also on the rear are the two doors, one for USB 2 connection and the other to access the storage cards. The card door is to the users rear right and is spring loaded and 'clipped' shut. Inside are two slots for CF and xD cards. Next to the xD card opening is a sunken pin that is assumed to be some sort of output for interrogation of internal components. The front of the camera has only the lens release button. The base plate has the BLM1 battery access door as well as the metal tripod bush. On each end of the top plate is a raised black metal elongated strap lug.
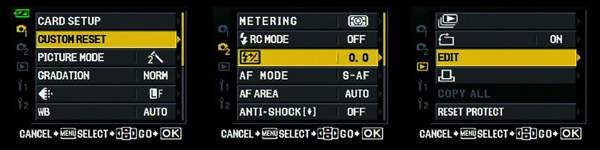
E-520 MENU SYSTEM: The screen menus in all Olympus DSLR's were updated around the time of the E-3. They all follow a similar basic format but some have more choices than others, camera dependent. This is the E-520 MENU in full:
CAMERA 1 * Card setup (All erase, format) dependent on card selected (see SPANNER 2, choice 2) * Custom reset: (Reset, reset 1, reset 2) - reset to defaults or to the settings of your choice (MyMode) * Picture mode: Vivid, Natural, Muted, Portrait, Monotone, Custom * Gradation: Auto, Normal, High key, Low key * Image quality: RAW, Large/Fine, Large/Normal, Medium/Normal, Small/Normal, RAW+L/F, RAW+L/N, RAW+M/N, RAW + S/N) JPEG size & compression customizable * White balance: Auto, Sunlight, Shade, Cloudy, Tungsten, White Fluorescent, Neutral White Fluorescent, Daylight Fluorescent, One-Touch, Color Temperature * ISO sensitivity: Auto, 100, 200, 400, 800, 1600 * Noise reduction: On, Off, Auto (long exposures only) * Noise filter: Off, Low, Standard, High (determines noise reduction applied to images) CAMERA 2 * Metering: ESP+AF, ESP, CW, Spot, Highlight Spot, Shadow Spot * Flash RC mode: On/Off (controls wireless flashes FL36R/50R * Flash exposure compensation: -3EV to +3EV by 1/3EV increments * AF mode: Single AF, Cont. AF, Manual focus, Single AF + MF, Cont AF + MF * AF area: Auto, Left, Center, Right (VF only) * Anti-shock: Off, 1 - 30 secs selectable (Olympus' Mirror lock Up) * AE bracketing: Off, 3 frames/0.3EV, 3 frames/0.7EV, 3 frames/1.0EV * WB bracketing: Off, 3 frames/2 steps, 3 frames/4 steps, 3 frames/6 steps (various WB bracketing options) * Flash bracketing: Off, 3 frames/0.3EV, 3 frames/0.7EV, 3 frames/1.0EV REVIEW * Slideshow: 1, 4, 9, 16, 25, 49, 100 frames (selectable number of screen images shown) * Auto rotate: On/Off) (change captured portrait orientation) * Edit: Choices over these: RAW Data Edit and JPEG edit: Shadow Adjustment, Redeye Fix, Crop, B&W, Sepia, Saturation, Resize * DPOF print marking: One, All * Copy all: Copies from one memory card to another (xD to CF) * Reset protect: On/Off)
SPANNER 1 (i) AF/MF: * AF illuminator: On/Off) * Focus ring: Counterclockwise, Clockwise (direction of FBW focus rings) * Reset lens: On/Off (resets lens to infinity when camera turned off) * Bulb focusing: On/Off (selectable focus during bulb exposure) * Live view AF: AF sensor, Hybrid AF, Imager AF (see above) (ii) Button/Dial: * Dial: you may select what the command dial controls viz: (a) Program mode: Program Shift, Exposure Comp (b) Aperture priority mode: Aperture, Exposure Comp (c) Shutter priority mode: Shutter speed, Exposure comp (d) Manual mode: Shutter Speed, Aperture) * Dial direction: Dial 1, 2 (selectable for effect of turning the dial L or R * AE/AF lock viz: (a) S-AF: Mode 1, 2, 3 (b) C-AF: Mode 1, 2, 3, 4 (c) MF: Mode 1, 2, 3 * AE/AF lock memory: On/Off (makes button sticky) * Function button: Face Detection, Preview, Live Preview, One-touch WB, Home Focus Point, Manual Focus, RAW quality, Test Picture, Program Mode, My Mode, Off (programmable button) * Drive button: Drive, AF Area, AF Mode, WB, Metering, ISO (programmable button) * My Mode setup: My Mode 1, 2 (programmable modes for favorite settings) * Button timer: Off, 3, 5, 8 sec, Hold (direct button active memory) * AE/AF lock: Function Button swap: On/Off (programmable button swap) * Arrow pad lock: On/Off (prevents accidentally changing four-way controller settings) (iii) Release/Continuous: * Release priority S: On/Off (whether focus lock is required for shutter release) * Release priority C: On/Off (as above, but in continuous AF mode) (iv) Display/Sound/PC: * Beep: On/Off * Sleep: Off, 1, 3, 5, 10 mins * Backlit LCD: 8 sec, 30 sec, 1 min, hold * 4 hour timer: Off, 4 hr (turns camera off after 4 hours) * USB mode: Auto: Storage, MTP, Control, Easy PictBridge, Custom PictBridge * Live view boost: On/Off (boosts screen brightness in low light in live view) * Face detection: On/Off (in live view mode) * Frame assist: Off, Grid, Golden section, Scale (see above) (v) Exposure/Metering/ISO: * EV step: 1/3, 1/2, 1 EV (selectable) * ISO Auto set: 100 - 1600 (selectable top limit of Auto ISO) * ISO Auto: P/A/S/All (when auto ISO is available) * AEL metering: Auto, CW, Spot, Spot Highlight, Spot shadow * Bulb timer: 1, 2, 4, 8, 15, 20, 25, 30 mins (selectable time for bulb mode) (vi) Flash custom: * X-sync: 1/60 - 1/180 sec * Slow limit: 1/30 - 1/180 sec * Flash exp comp + exp comp: On/Off (selectable flash exposure compensation linked to exposure compensation) * Auto pop-up: On/Off (selectable if flash pops up when required in auto or scene mode) (vii) Quality/Color/WB: * All white balance compensation: Choices to set: All set: -7 to +7; and All reset * Color space: sRGB or AdobeRGB * Shading compensation: On/Off (to help reduce vignetting) * Image quality set: Large/Medium/Small, Superfine/fine/normal/basic (selectable size and compression) * Pixel count: (selectable resolution for following sizes): Middle: 3200 x 2400, 2560 x 1920, 1600 x 1200; Small: 1280 x 960, 1024 x 768, 640 x 480 (viii) Record/Erase: * Quick erase: On/Off (should camera prompt you to delete photo?) * RAW+JPEG erase: JPEG, RAW, RAW+JPEG (decide what is removed when you delete a RAW+JPEG photo?) * File name: Auto, Reset * Priority set: No, Yes (first position of the highlighted box in All Erase or Card Format) * dpi setting: Auto, Custom (allows setting of dpi) (ix) Utility: * Cleaning mode: (mirror lock up for manual sensor cleaning) * Scene mode swap: Sport/Night Portrait, Underwater wide/macro (allows swapping on mode dial) SPANNER 2: * Date/time: (to set) * CF/xD: (which card slot to use) * Edit filename: (change file naming system) with choices for AdobeRGB: Off, A-Z, 0-9; and sRGB: Off, A-Z, 0-9 * LCD brightness: Choices over Brightness: -7 to +7 and Color balance: -7 to +7 * Language: * Video out: NTSC, PAL * Rec View: Off, Auto play, 1 - 20 secs (image review; auto play option enters playback mode after image recorded) * Pixel mapping: (Re-maps/maps out bad pixels on the sensor) * Firmware: (shows current firmware version of body and attached lens)
E-520 IN USE: I'd like to comment about the general handling of the E-520. The camera is a joy to use. It is sufficiently lightweight not to deter you from carrying it everywhere, yet just heavy enough to inspire confidence when using. Matched with the two 'kit' lenses the user is provided with a range of focal lengths to tackle virtually any situation they may be faced with. In particular the ZD14-42mm (28-84mm equivalent) is a superb little lens I have tested before against some of the most expensive lenses Olympus produce with remarkable results (you can see that report here .) It offers tremendous value for money. The longer ZD40-150mm (80-300mm equivalent) is equally as good though not quite as contrasty as its predecessor (in my opinion). It is also good to see Olympus continuing to develop their 'budget' range of lenses by the addition of ED glass to both newcomers. Surely, for very many users the E-520 and its two kit lenses will be more than enough for many years of enjoyable photography without needing to invest further. It is a great tribute to whoever designed the E-500 back in 2005 that they got the whole thing pretty near perfect.
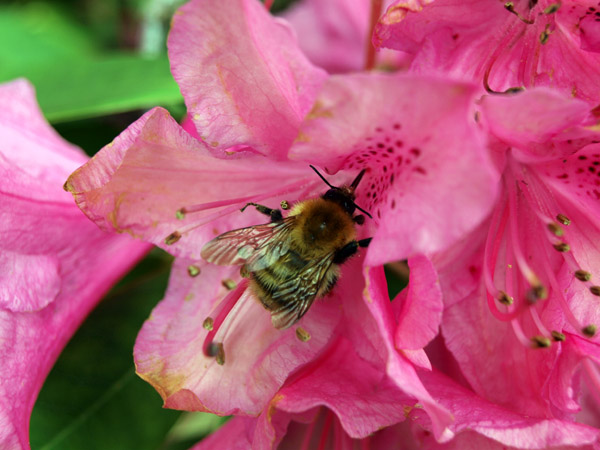
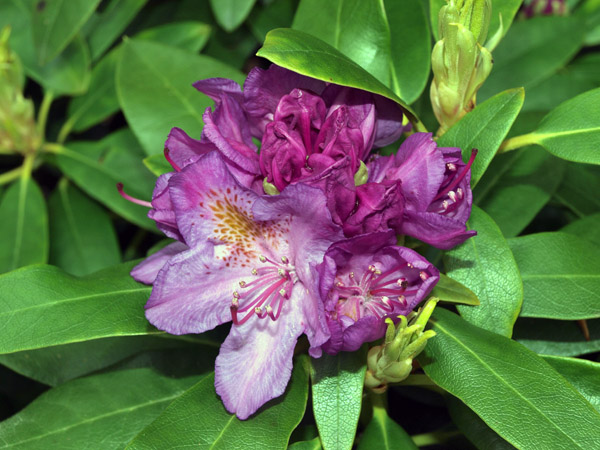
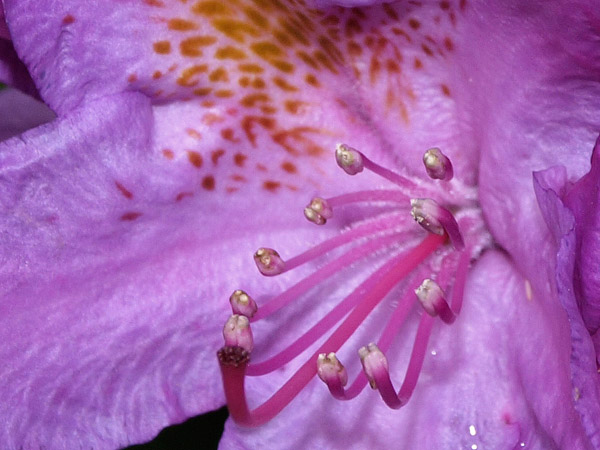
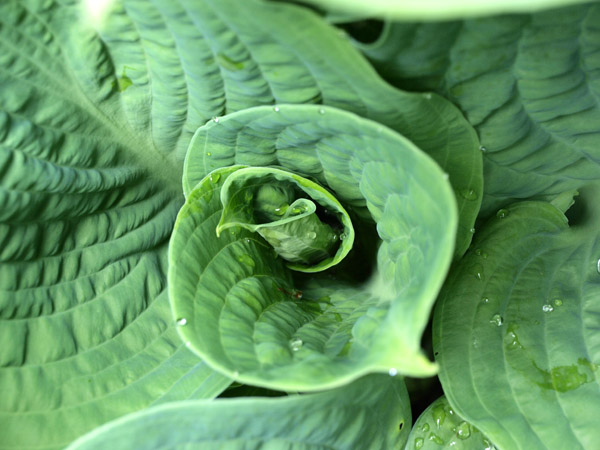
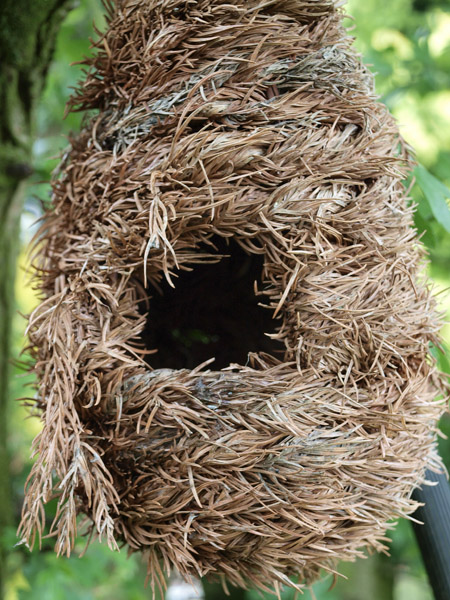
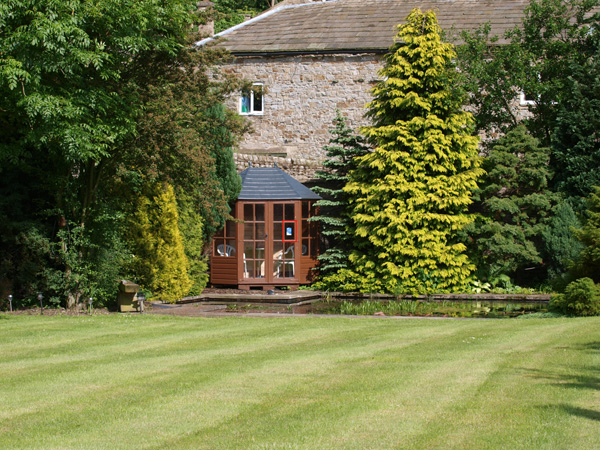
E-520 IMAGES: I have provided 8 quick sample images and some 100% crops for your perusal. I have damaged my knee and current movements are restricted to my garden only. Hopefully I may be able to get out and about next week and post more. For now images are boring garden shots. They are reduced to web size (and slightly sharpened) for monitor viewing but I will be uploading the original LF jpg's early next week. All sample images taken in A mode, LF jpg, ESP metering with no compensation, Auto Gradation, Auto WB, IS-1, Auto ISO, all else default. When I can walk a little better I shall carry out more tests on ISO and Noise Reduction as well as samples with Gradation On and Off. Please look back in a week.
As said above, I'll be revisiting this section next week with more tests, so please keep looking.
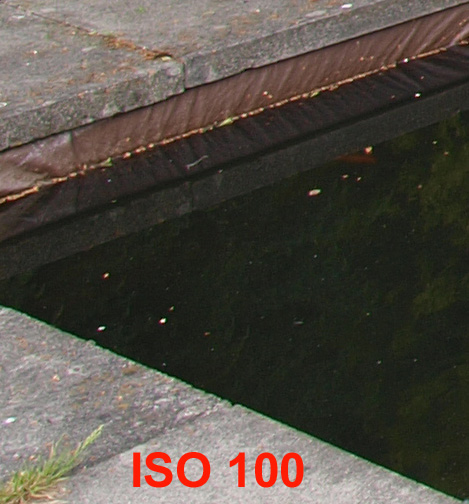
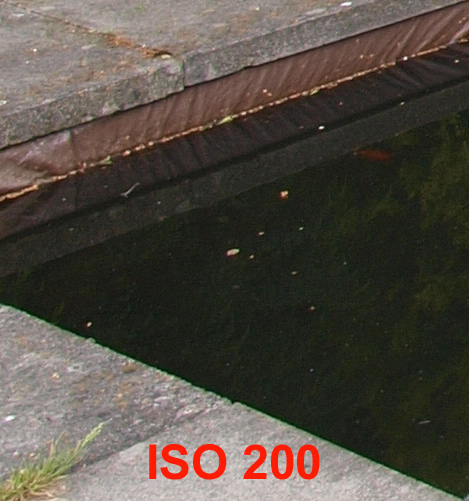
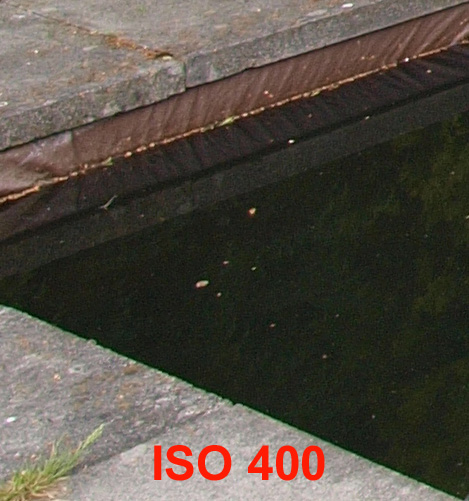
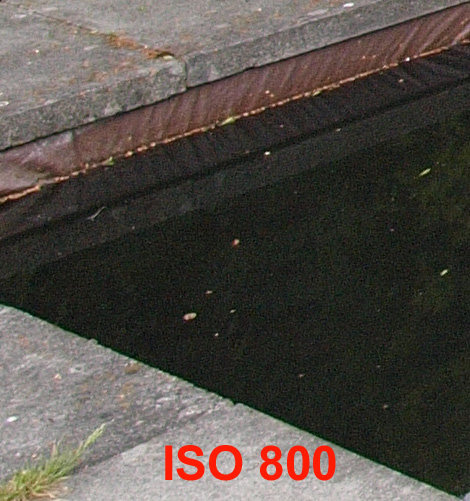
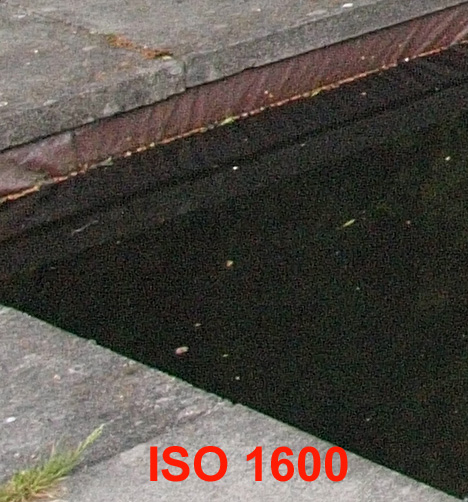
MORE TEST IMAGES: As promised I have taken more sets of images for closer examination of ISO performance and some in camera processing, but have not managed to go further than my garden. However, I think they will should do the job. ISO Performance: On a bright and clear day I set my tripod up next to the pond to give me some dark areas to show the type and distribution on any ISO noise that might appear as the gain is cranked up. This is the general view with the crop section marked:
Here are the 100% ISO crops duly marked up:
Yes, there is noise present at ISO 400 and above. The amount of noise at ISO 400 is insignificant but it is better to be aware that it may occur. I applied no minus compensation to this exposure even though it was probably necessary, as this may have made the noise speckles slightly worse. At ISO 800 noise is more pronounced but it is still unlikely this will show in a print even if enlarged considerably. At ISO 1600 the image is quite noisy but easy to remove with software like NoiseNinja. Personally, noise doesn't bother me unduly. It is no worse than film grain. While ISO noise is still apparent at 800 and 1600 settings I believe Olympus have made great strides in its control. Compared to the E-500's noisy performance that effectively limited that machine to ISO400 and even this could get noisy, the E-520 is a polished performer. Of course there is noise present and if you really want noiseless high ISO performance (1600+) then Olympus is not for you. But remember Olympus offers a rounded package that tries to compensate for increased noise by offereing in-body stabilization giving you back much more than the one stop you lose out to noisy high ISO. That, alongside the best kit lenses from any manufacturer, redress the balance. Note on Banding: You may have seen different images in this section for a few hours yesterday. I originally posted this section thinking I had completed the ISO images properly but late last night I noticed I had left the GRADATION setting to AUTO throughout the ISO and NR shots. This resulted in slight banding at high ISO and following Noise Filtering. I have re-shot the images with all other in-camera processing set to OFF and you can see there's no banding. The banding I saw yesterday was not particularly significant but it was there. It follows that you need to check the GRADATION settings on the E-520 before applying high ISO and using the Noise Filter. Having studied the new images (posted above) in detail I am confident I can see no banding in any of them.
Noise Filter: I keep the camera in the same position and set the ISO to 1600 for each shot. I set the NR in the camera for each of the four settings; off, low, standard and high and record one image per setting. Here's the 100% cropped results:
The in-camera noise filtering (removal) is quite useful providing you are exactly aware of its extent and imapct. The higher the setting the more noise is removed but you lose a proportional amount of finer detail. Of course you may decide to apply some post capture sharpening to compensate for the apparent loss of sharpness. As with most things it is a balance between the ISO speed you need to get the shot and the noise filter level you choose (if indeed you choose any). I admit I rarely use high ISO so it is of no real concern to me and if I found it necessary to use high ISO I would be happy to use the noise filter on either of the two lowest settings to cut back on post processing. But of course you opinion will vary and that's what so great about today's DSLR's - CHOICE; you can chose to do whatever you think to get the shot.
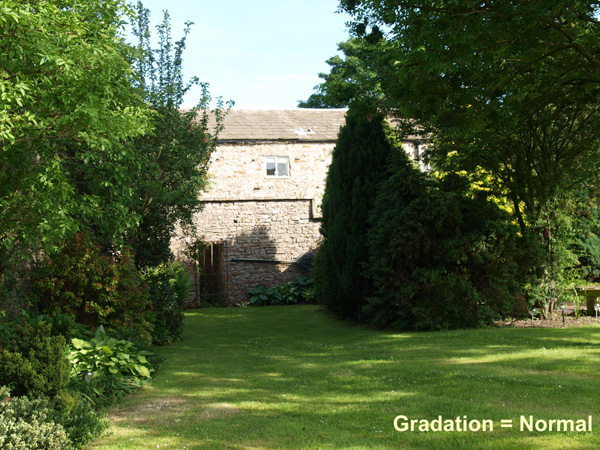
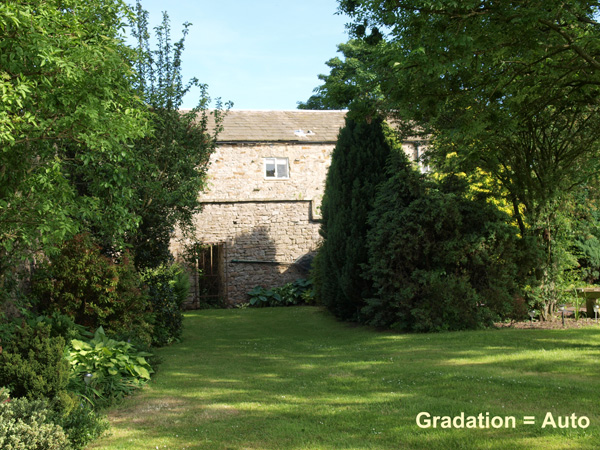
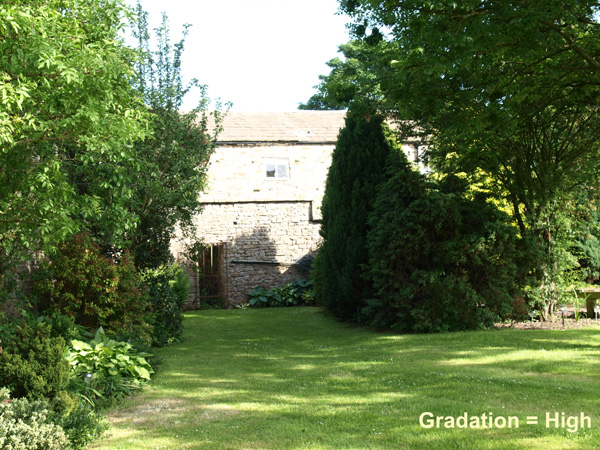
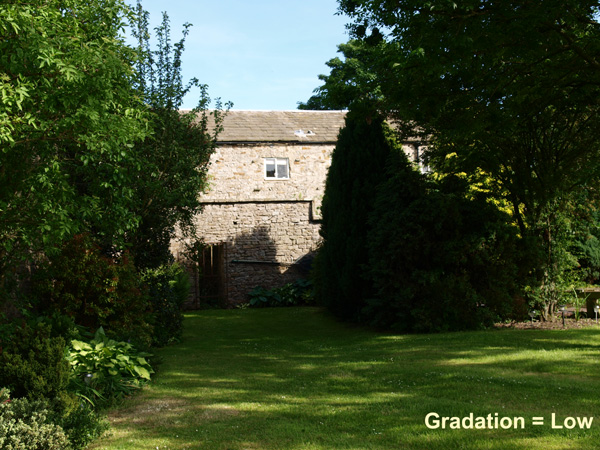
Shadow Adjustment Technology (SAT): Following in the wake of the E-3 the E-520 offers SAT controlled by the GRADATION settings in the menu. This is another level of in-camera control and processing and is very subtle in its application. There are four levels offered; Normal, Auto, High Key and Low Key. As far as I can see the Normal setting means no adjustment takes place or it is so subtle I cannot see what it does. The Auto setting does work and work well. It slightly underexposes the scene and applies a slight lift to the shadow levels producing results that might prove challenging if you were relying on post processing. The secret is being able to recognise those circumstances where SAT (in particular Auto Gradation) will deliver. Anywhere you have both heavy shadows and 'normal' lighting will benefit from the AUTO Gradation setting. Here's an example where I applied each of the four settings in sequence:
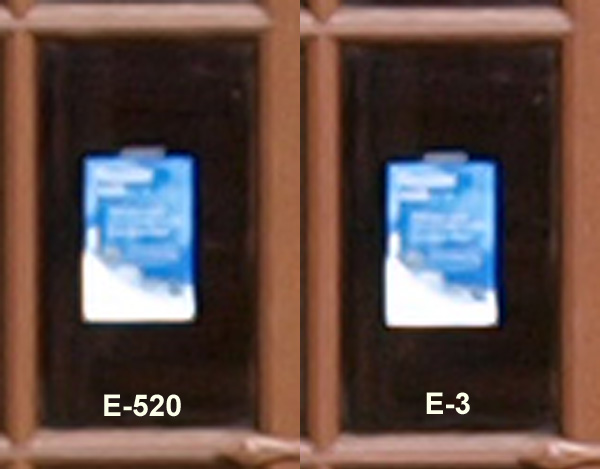
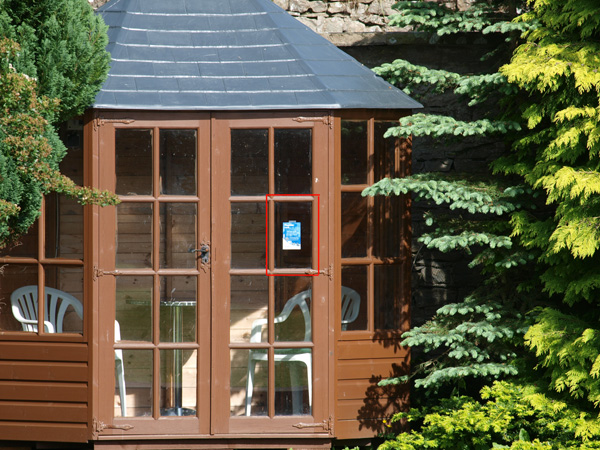
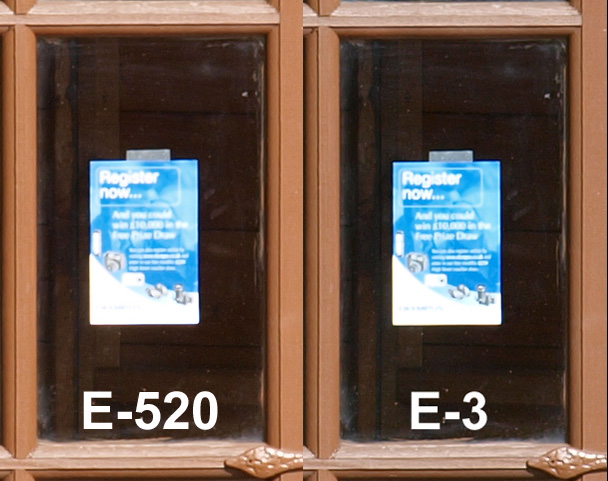
Personally I never use High & Low Key settings as there are easier ways to achieve the goal but I use Auto Gradation quite a lot and this is likely because I'm a great jpg fan. I rarely use the RAW format as I firmly believe that virtually all Olympus DSLR jpg engines deliver very high quality results straight out of the camera. Don't get me wrong, I can and have processed RAW images, but I rarely end up with a result that justifies the overall effort involved. But if the camera offers a setting that will enhance its already excellent jpg engine, as does Auto Gradation, I'm all for using it. Choosing jpg saves time, as does anything that enhances jpg's straight from the camera. I prefer to spend my time out and and about taking photo's rather than sitting in front of my PC processing RAW files. But, each to his own! Comparing Images from E-3 to E-520: I have done a quick series of comparative images with both cameras using the ZD50-200mm lens to see what the differences might be. I set the tripod up at 130 feet away from the target (an Olympus flyer less than A5 size) that was taped to one of the glass panels. Yes, I cleaned the glass! The first set is with the ZD50-200mm set at 50mm, with the crops at 100% shown below.
Full Size jpg for download: I've received a lot of requests from readers to provide a 'straight from camera jpg' for anyone who might want to thoroughly examine a file from the E-520. As the camera is commercially available certain parts of the world and I have not been instructed by Olympus NOT to provide images, I'm assuming this will be OK. Most of the EXIF information will be complete. Image taken 13th June 2008, E-520, ZD14-42mm at 42mm, f=6.3, 1/500th sec, ISO100, EV Comp -0.3.
Download a zip file of the above image (7.22MB) here .
LIKES/DISLIKES: I've been asked by many readers to provide a resume towards the end. (That's OK as long as you don't simply come straight here and ignore the rest of my hard work!) This list is inevitably influenced by personal preferences that may be insignificant to others. I LIKE: Size, weight and 99% of ergonomics and handling Plenty of direct access buttons and programmability AUTO setting on REC VIEW ala E-3 - instant access to exposure information on LCD Aesthetics - mixture of subtle changes and rounded edges gives it a great look Overall speed of everything (apart from review being a tiny bit tardy) Intuitiveness - the menu system is a great improvement Image Quality is excellent; very similar to the E-3
I DON'T LIKE: The two button placement under the thumb wheel No means of external power No proper VF blind The read-out on the right - underneath the main VF area is the only place for this.
CONCLUSION: Now I've completed most of the testing and detailed image examination I conclude that the E-520 is not that far behind the E-3 in many respects, particularly Image Quality. (But you need to set up the individual attributes - Picture Mode(s) and contrast, sharpness & saturation - to suit your own preferences). The cameras general performance and ergonomics causes me no distress at all. It is fast and responsive and has a superb selection of dial, button and menu access to satisfy every level of user. For a mid-range DSLR with a price tag of £450 (body only) the E-520 offers all you need and most of what you want and must represent the best value on the planet. Olympus produced a winner with the E-500; the E-510 surpassed expectations and I'm convinced the E-520 will continue this trend. If you want a highly sophisticated and competent machine that represents cracking value for money you cannot go wrong with the E-520. That it is available in a one and two lens kit form simply adds to its innate value as the kit lenses are excellent too. I warmed to the E-520 the moment I took it from its box and the more I've used it the more my respect for the machine has increased. There's so little not to like and so much to admire. Any room for improvement (such as a bigger viewfinder and an updated AF system) can only come in a new body with a different pricing structure. But maybe there is room for one more level of E-System machine between the E-520 and the E-3? I'm sure Olympus R&D are looking at this right now! I have enjoyed my two weeks with the camera and am delighted to report back on its high qualities of design, features, performance and output. I have no real issues to report, this is simply a great machine.
PRICE: The E-520 is due for release early June 2008 (in UK) and set to be offered at: £450 Body Only; £500 with ZD14-42 kit lens; £550 with ZD's 14-42mm and 40-150mm. Knowing how the market responds to new DSLR releases these prices might hold for a few months before dropping by an average 25% each. Excellent value.
|