OLYMPUS P-S100
dye sublimation printer
|
OLYMPUS P-S100 dye sublimation printer |
|
INTRODUCTION: I no longer use my trusy old Epson 740 Photo Quality inkjet as I (a) have little room for it and (b) have only occassional need for 'HQ Photo' printing. This means the printer stands unused for weeks or months. Herein the problems; no space, little use. Whenever I need it I have to spend ages going through the print head cleaning routine to find that as soon as the blocked nozzels are clear I'm out of ink. Living in the middle of no-where is great except when it comes to these times. I've tried keeping a spare set of inks only to find they don't; (keep well). It means a round trip of around 80 miles to get new cartridges. Not only does this add heavily to cost, by the time I've done all this I've gone right off the original idea. (I have two high grade lasers; HP 2300 monochrome and Minolta 2210 colour and for the vast majority of my personal printing needs these do fine - I reckon 98% of my personal printing is mono anyway). For about 18 months I've been thinking about my options for those times when I'd like to print out a photo or two. Inkjet is out for stated reasons. Lasers produce excellent results but they aren't photo quality. I've no experience of bubble-jets but suspect they have the same problem as inkjets if not used regularly. The only option left is dye-sub. Before I took my thoughts further I looked at my probable requirements. My missus has an inkjet I can access for A4 size stuff (though her charges are a tad heavy :-o) so the occassional 8" x 10" is catered for. Anything larger means a PhotoLab in any case. It seems my basic requirement is for 6" x 4" prints on demand with possible huge gaps of time between print runs. Research tells me dye-subs can be left for 6 months without concern so I'm drawn to this technology. I do not want an A4 capable dye-sub so the larger HiTi and Olympus P400 are out. This leaves an array of 'home lab' printers from Sony, Canon, Kodak and Olympus. (I was surprised to discover the little Epson PictureMate is a mini-inkjet). As an Olympus fan I looked at their range first. The P10 and new P11 are well specced though I'm not keen on the cube like appearance. HiTi's printing 4 x 6 are quite large but the Canon and Sony offerings are very small and neat. Decisions! Now it just so happened that recently one of our big brand stores was offering a good deal on the Olympus P-S100; in fact it was for free with another purchase. It seemed to fit the bill, I was going to buy the other bit in any case, so I plumped for it.
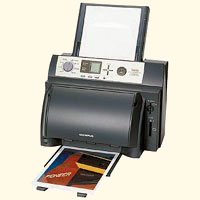
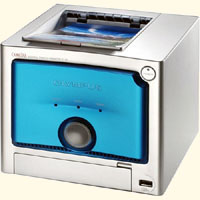
FIRST IMPRESSIONS: For such a tiny printer this is a big box! The box contains the printer, power supply/adapter and 2 leads, standard size box of consumables, documentation and driver software. The consumables box contains a plastic cassette with 50 Photo sheets and the ribbon. The printer is an elegant white metal flake finished plastic box 6.6" W x 5.7" D x 2.8" H with a fine chrome strip around the top that looks like a lid but isn't. There's a door to the front where the paper cassette fits and another to the side where the ribbon slides in. The ON/OFF button is on the top and glows green when ON. There are two red ERROR lights for paper and ribbon and a wide blue ACCESS light to let you know it's talking. The P-S100 is not equipped with any form of memory card slots or a mini-screen for pre-viewing or manipulating images. On the back of the printer are four connectors; power in, PC USB in, camera USB in and a hard disk drive interface for FE/IR systems. This printer was designed for the IR/FE range of Olympus cameras; part of a design effort to integrate printer, camera and portable hard disk. However it is also sold as an independent printer. It is PictBridge; this means it will print from certain cameras and other devices without the need for a PC. It also works as a normal PC connected printer too. It is small, neat and very classy.
RELEVANT SPECIFICATIONS: * Print method ~ Dye sublimation thermal transfer * Resolution ~ 306 dpi * Colour reproduction ~ Over 16.77 million colours * Paper size & print speed ~ 3.5" x 5" = 84 secs; 4" x 6" = 88 secs * Weight ~ 1.1 kilo (2.5lbs) * Interfaces ~ PictBridge, USB B type, Dock&Done (Olympus) * Image files ~ Exif 1.0 to 2.2 JPEG & TIFF. (RAW not supported)
SETTING UP:
To use this as a PictBridge printer you simply put in the consumables, supply printer with power and plug in the cameras USB lead. I tried this with our C70. Works fine. You select the image you want to print, access the camera menu, confirm the print and number and that's it. Next comes an interminable wait as the cameras tiny processor download the image to the printer. There's a lot of processing to do; as well as the image transfer there's the re-sizing to suit the tiny printer. All in it took about 4-5 minutes before the printer buzzes and begins to print. This is too long a wait for me. This direct interface is OK for the very occassional print only. For anything more set the P-S100 up as a PC connected printer. To use the P-S100 as a traditional printer, load the software into your PC first, then plug the PC's USB into the P-S100, switch it on and the OS does the rest. Genuinely easy. As a PC connected printer it can still be used as a PictBridge unit. When the cameras USB is plugged in the printer drops its USB connection with the PC; ingenious.
PRINTER IN ACTION: Although the printer is tiny it does require a much larger footprint on your desktop to accomodate the front paper cassette and the rear projection. Allow about 7" (W) x 16" (D). With the P-S100 connected to your PC transfer of image and instruction to the printer is very quick. The blue ACCESS light strobes telling you the communication is fine. When the tranfer is complete the printer whirrs and printing starts. It's a multistage process. The paper is taken from the cassette and disappears through the printer to appear out of the back by about 3.5". It now passes forward and in this, the first pass, the yellow is laid down. The process repeats for magenta, cyan and then the protective film. Four passes and fascinating to watch - for the first few times anyway! The print emerges pristine, dry and immediately handleable. Speed is acceptable; 88 seconds for the print process. This might seem a long time but my inkjet was as slow at the resolution needed to produce a Photo Quality print. I'm always wary of super fast printers - these are the ones that spit the paper out or get it misaligned in their hurry to get the job done. The stated 306dpi in dye sub terms is equivalent to about 4800 x 4800 from an inkjet or laser. I note that other Olympus dye-subs are rated at 312dpi. I do not know why the P-S100 is 2% lower.
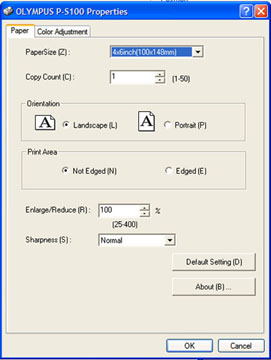
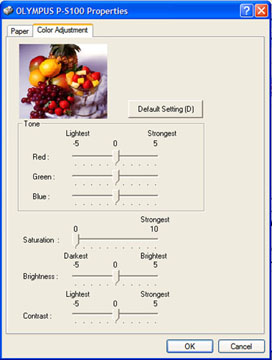
PRINTER SOFTWARE: The printer control software is basic. The two control screens are:
RESULTS: I chose the image below for the comparative tests. This is it straight off the camera - an Olympus C5050 in SHQ JPEG. File size about 14MB. It has been resized for web display; 8" x 6" @ 72 dpi. No other post processing. I've never seen this image in print form.
With a copy of the original I do the necessary adjustments to give the best print size/resolution from the P-S100. In PhotoShop in the image size box I alter the resolution to 450dpi and making sure the 'constrain proportion' box is checked set the width to 152mm. It took me a while to find these settings to suit the P-S100 and no doubt you will experiment with your own. This basic resetting results in a file size of about 7MB - 50% of the original. In 'Print with preview' I check the stretch to fit box and then print with the P-S100 on default settings. This is the resultant print. (It was scanned as soon as it came off the P-S100 with an Epson 4990 Photo scanner on HQ photo settings). I left the tear-off ends (white perforation marks) on the print to show the accurate width before 'trimming'.
CRITIQUE 1: You can see the slight change in size. This is due to re-sizing it to 152mm across. In setting this width it assures a full print on the Olympus paper. Anything less means a white border either top and bottom or ends. I prefer borderless prints - YMMV. It took me a few tries to get the width just right. Colour duplication looks pretty accurate to me but the resultant print is more contrasty and saturation appears slightly increased. Sharpness seems satisfactory for a small print and examination under a glass revealed no unsharpness. There are no lines or gradations, just a smooth transition from one colour to the next. The clear film finish imparts a glossy but not too shiny finish that looks hard wearing. If there was not this side by side comparison the print would be more than satisfactory. I'm impressed. However it's not perfect. I'm slightly concerned about the contrast and saturation. I'll try another print. This time I'll turn the wick down on some of the settings in the printer control software for the P-S100. The control software default for saturation is 0 so I can't lower this setting. Instead I tweak the brightness up 2 notches and the contrast down 2 notches. Here is print number 2:
This is better. Not quite as 'in your face' as the first attempt and much nearer the original. It could probably go down another notch or two, or reduce the blue slider by a notch, but this is near enough for me. It's not exact but if it were I'd be worried - I've never experienced a printer that does replicate exactly. My Minolta is profiled to my monitor and software and its results are pretty near but not exact. Bear in mind that the P-S100 has not been profiled to match my monitor (I don't even know if it can be profiled). And then there's the fact that the prints from the P-S100 have been digitised again by the scanner - which has not been profiled. I'm not going to mess around any further. The print is within 97% of the monitor representation and that's good. I'm very satisfied.
SHARPNESS CLIPS: From the original and from the second scanned print I've clipped out the two fragments below. These are at 1:1 (100%) and are almost the same in size. This is the fragment from the original:
This is the fragment from print number 2:
CRITIQUE 2: In these enlarged fragments you can see the slight difference in contrast and saturation. In addition the printing process appears to have 'smoothed' edge definition. Close examination shows a marginal loss of detail and edge sharpness but the smoothing creates an image easier on the eye. The printed output is less harsh and more subtle. It's a case of swings and roundabouts. I'm still very impressed.
OLYMPUS PAPER QUALITY: The standard replacement cassette from Olympus comes with 50 sheets of photo paper. I compared this to other photo paper we have from Epson and Swaines MEMORIE paper. They all appear to be the same weight and are all medium gloss finish (not heavy full shiny gloss). The Olympus paper is brighter than the Epson paper but not as bright as the MEMORIE. Make of this what you will. The finished prints from the P-S100 are coated in the dye-sub process - a fine transparent film is laid over in the final pass. This gives a robust finish to protect the image from the ravages of time, light, rough handling, fingerprints etc. Dye sub photos have a life of at least 40 years. A high quality output that is truly comparable to PhotoLab products. My only criticism of the output is the two perforated side edges of the photographs. I don't think the P10 and P11 use perforated paper but these have a built in paper feed tray whereas the P-S100 relies on a clip on tray; this is the likely reason. But this is a small gripe. To compensate for this gripe the plastic paper cassette can be reused as a stackable photo case. With it comes a clip-on top to close the box and a couple of stickers to identify the contents - neat.
COST AND RUNNING COSTS: A quick search of the Internet shows the P-S100 widely available with prices in UK being around £125 ~ £160 and US as low as $100 to $250. A full set of consumables for 50 prints comes with the printer. A replacement box has a RRP of £19.95. This price can be bettered on the Internet at £13.50 + postage but whether the supplier has any is another matter. At full price this works out at 40p per 6" x 4" print including paper. Not cheap. I never accurately checked the cost of my Epson inkjet but my memory tells me it was expensive to run. My missus is forever complaining she needs another damned cartridge for her HP inkjet, so I suspect my memory is correct. I've done some quick research that suggests the overall cost of a 8" x 10" colour inkjet print is 3.75 whereas the same on a dye sub is 2.35. In simple terms that's about 35% less. The cost of any form of desktop Photo Quality printing is high. Even if a dye sub print is the same as inkjet the lack of hassle from the dye sub printers must be a big bonus. The instructions tell you to use the printer every six months to ensure trouble free performance. An inkjet left for six months will require new cartridges at the very least. However any HQ desktop printing is far more expensive than using the PhotoLabs, some of which are very competetively priced at 5p/print. However you must factor in travelling time and petrol costs.
CONCLUSION: Everything depends on your HQ printing needs. Only you can assess that. This solution suits me for now though as technology advances it might offer alternatives. The P-S100 is simple to install, easy to use and the output is as good if not better than anything I've previously experienced and equal to the PhotoLab. Quiet and clean to use with no waste AND it is free of maintenance and worry. Since digital photography has become more affordable there has been a dramatic reduction in printed output. This trend might change as digicam users see the disadvantages of relying on screen output only. I hope so otherwise the documentation of our social history in in jeopardy.
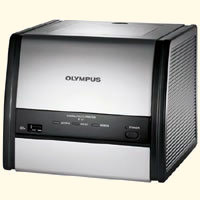
OTHER CURRENT MODELS: LEFT: Olympus P10 4 x 6; CENTRE: Newer, faster P11 4 x 6; RIGHT: The well established P400 A4
|
|
HOME |
INTRO |
BOOKS |
OLYMPUS CIRCLE |
QUEST |
TOC MEMBERS |
GALLERIES
|
| Posted 3rd January 2006 | Copyright © 2004/05/06 John Foster |
 __
__
 _____
_____ ____
____