E-SYSTEM
using om macro and ring flashes on e-system
updated may 2020 see jan steinman's article (scroll to bottom)
|
E-SYSTEM using om macro and ring flashes on e-system updated may 2020 see jan steinman's article (scroll to bottom) |
|
|
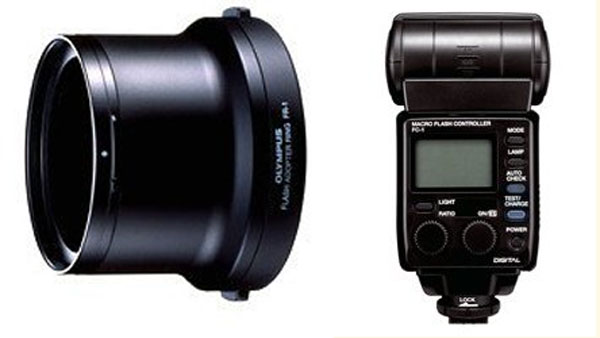
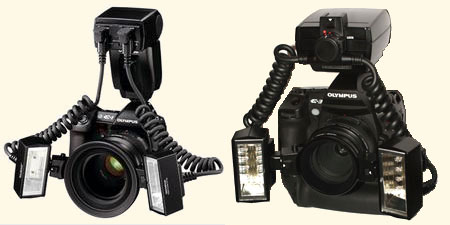
INTRODUCTION: One of the commonest subjects raised with me by emigres from OM to the Olympus E-system is whether it is safe and practical to use OM system flashes on their new cameras. USE OF STANDARD T20, T32, F280 on the E-System: This question has been asked almost from day one of the E-1 for good reason; the cost of E-system flashes is exorbitant. Quite simply all OM flashes are safe except the 310 series which have a high trigger voltage and must be avoided. I have used the T20, T32 and F280 on the E-1 without issue; I have not tried the T18. Each of the flashes can be used in manual mode and full auto mode but NOT in TTL or FP mode (where available). This is because the circuitry within the E-system cameras is designed to co-exist and communicate with the E-system flashes giving a high degree of compatibility especially with the zooming heads. OM flashes on the other hand were designed to communicate with OM2 onwards to provide full control of the flash duration/intensity as metered Through The Lens (TTL). While these flashes can be used successfully, they do require some level of understanding in manual mode and practice in full auto mode, to get the best out of them. Because the results can occasionally be a little flaky I don't particularly recommend any of them due to the loss of functionality. But with a slave trigger or studio light extension they are useful for secondary lighting or hair lights. The E-system all-purpose flashes, FL20 priced at £90, FL36 priced at £179 and the FL50 priced at £350 simply offer so much integration that trying an OM workaround is not worth the effort. But when it comes to the specialised flash systems offered for E-cameras for use in macro and super macro arenas the prices do make you swallow hard. E-SYSTEM MACRO FLASH: Macro and ring flashes are used to improve the harsh highlights and shadows cast by direct flash units; ring flashes produce pleasant diffused 'all round' lighting that is virtually shadowless whereas twin macro flashes can be angled and positioned to illuminate the subject exactly as the photographer wishes with highlights and shadow areas directly under his control. These come as two distinct units: 1. The simpler ring flash, FS-SRF11 that sells at £500 and fits the 50mm Macro lens and lenses with a hood/filter ring of 67mm (14-54 & 50-200) with the use of the adapter FS-FR1. 2. The more complex FS-STF22 Twin Flash that sells for £600 and fits the 50mm & 35mm Macro, 11-22, 14-54, 12-60, 50-200, 14-45 & 40-150, with the adapter FS-FR1 (£100) and a further adapter ring (included). The controller unit that is included with either flash choice is separately priced at £320. Whichever way you choose to go this is an expensive system that only works with certain lenses, though full compatability and seamless TTL integration with any E-system body is delivered.
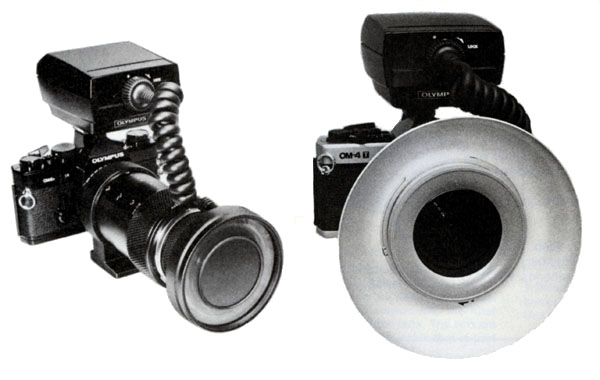
OM MACRO FLASH: The older OM system offered three distinct units for macro flash; T8 & T10 which were ring flashes, and the T28 which was a twin headed flash unit using rectangular flash heads. Generally, the T8 was beloved of the medical and dental profession (though not exclusively), the T10 was a great all-rounder and the T28 was top of the range twin flash unit aimed at higher magnification and specialised macro photography. For anyone interested in the prices of OM macro/ring flashes in 1995 they were: T10 Ring Flash = £190.00 T8 Ring Flash = £400.00 (2 reflectors incl) T28 Twin Macro Flash = £310.00 T10 Power Control = £410.00 The principle was the same as the new E-system; a controller (in the OM system a T32 body known as the T10 Power Control), curled wire connections and a choice of flash units/flash heads and power. They are for all intent and purpose the same thing separated by some 25 years.
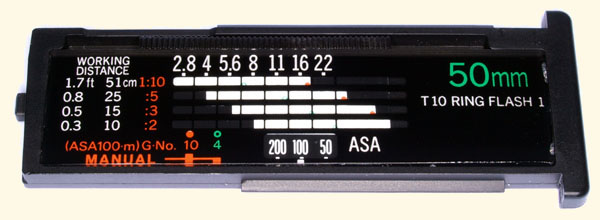
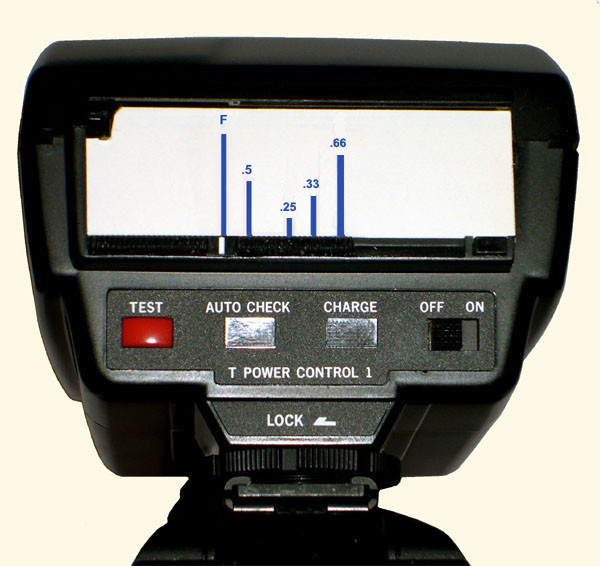
HOW THE OM2 CONTROLLED THE EXPOSURE IN TTL MODE: In 'automatic' flash exposures using T series flashes, the light falling on the film is metered during the time the first shutter curtain is fully open and when the pre-determined level of light has been received for correct exposure the flash source is turned off and the second shutter curtain is closed. This system is known as Through the Lens Off the Film metering; TTL OTF. This is 'relatively' straight forward as the maximum synchronisation speed is set to 1/60th, the film speed setting is accounted for in the overall metering and both ambient and flash generated light is measured by the chip as it comes through the lens on to the film. This is achieved with the T series flash panel inserted to show 'Full automatic control by OM2'. With the panel flipped the 'manual' control side shows so you can set the flash intensity (G No) against the lens aperture (and vice versa) to suit conditions. Remember the OM system used 1/60th flash synchronisation and of course the ISO(ASA) was determined by film choice and therefore fixed unless you push/pulled the exposure mid-roll and developed accordingly. In manual mode there are two flash output settings, full and half (on the illustrated T10 panel below, G No 10 or 4), with the exposure calculated by a mix of film speed (ISO/ASA), distance and aperture, judged and set by the user. Thus if you were using ASA100 film and the working distance is 1.7feet, the aperture would be between f=5.6 & 8.0 at GN 4 or f=16 at GN 10 (please see photo of panel below).
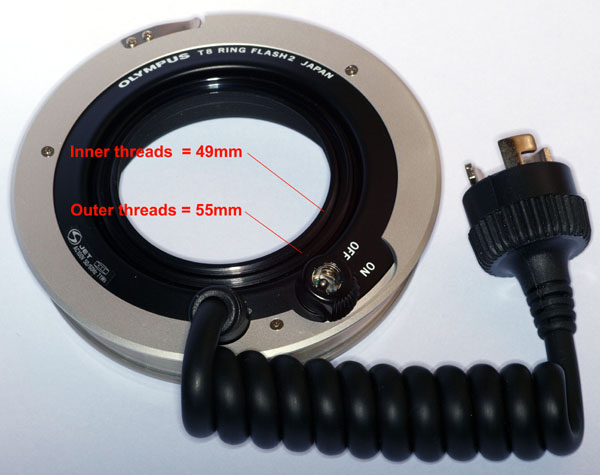
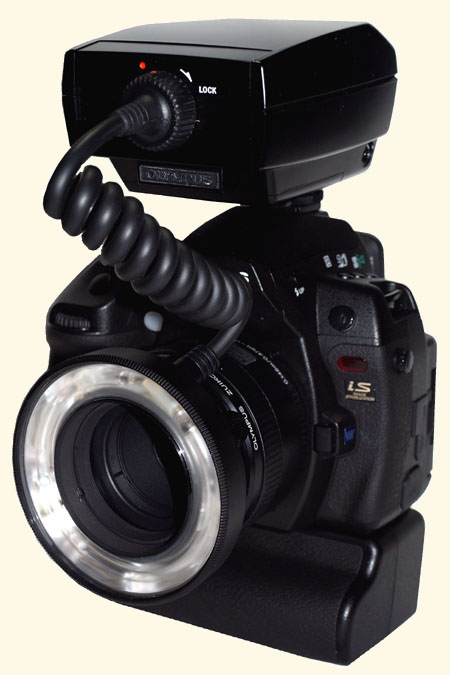
USING OM MACRO/RING FLASH(ES) ON E-SYSTEM: Those of you with OM macro/ring flash units already languishing in your cupboards or those who might be tempted to buy an OM set secondhand hoping to use it occasionally on your E-System, will be pleased to read I use mine on all my E-bodies. One of the advantages of using the OM system macro/ring flashes with the E-3 is that the flash duration allows the use of shutter speeds up to 1/400th of a second with only the slightest hint of shutter vignette and totally free of vignette at 1/320th with all E-system cameras. This is a third of a stop higher than the E-specifications indicate and much higher than OM. This is quite significant, especially as you are sacrificing any TTL control. Remember, the ring flashes T8 and T10 and the twin-head unit flash the T28 originally designed exclusively for the OM 2 onwards, lose any integrated compatibility and must operate manually. But, if you are prepared to spend a few minutes understanding how to operate these units in full manual mode they do offer an affordable and capable alternative to the very expensive E-system options. Obviously, the first way to use these units is to restrict their use to OM Zuiko lenses on your E-camera with 4/3rds to OM adapter. In this case you might choose either those OM's with good close focus abilities or the dedicated OM macro lenses. In some ways this is is a good option as you will be in total control of focus, aperture, exposure and flash; but it is not the most convenient. If you fancy operating a hybrid system by integrating the older OM macro/ring flashes with your E-body and one or two dedicated ZD auto focus lenses then you need to understand how the old units attached to the OM system. Firstly, the OM units were usable with either 49mm or 55mm filter ring lenses (this covers 95% of OM lenses) by having twin mounting rings built into the either of the two ring flash units or in the case of the T28 the flash shoe ring. These rings screwed into the filter ring of any 49 or 55mm lens. This facilitated use of these flash units across the range of OM Macro (and other) lenses as well as working in conjunction with the unique 65-116 macro tube and macro bellows. Below is a photo of the underside of the T8 unit showing the twin mounting rings; 49mm & 55mm.
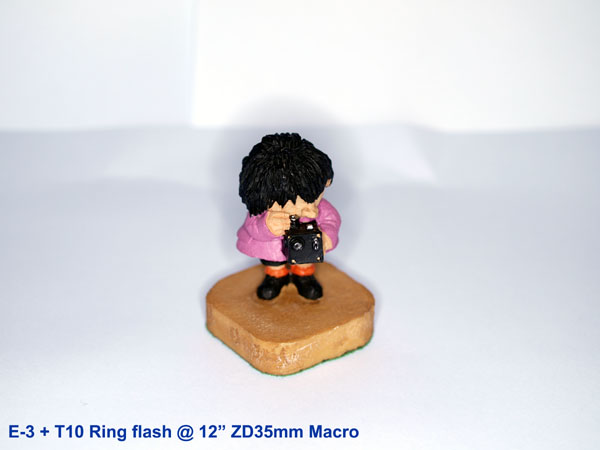
HOW TO ATTACH THE OM MACRO/RING FLASH(ES) TO E-SYSTEM: I have adapted my 'system' to use only the E-System ZD35mm and ZD50mm macro lenses, both of which have a 52mm filter ring. The only additional item required is a 52-55mm stepping ring where 52mm is the filter size and 55mm is the accessory size. These stepping rings are available at SRB-Griturn in the UK by mail order or Internet. You can go to SRB-Griturn's extensive website here. The stepping ring costs £8.00 including post in UK. Once you obtain your stepping ring all you need do is screw it into the filter ring of either the ZD35mm or 50mm lens and then mount whichever of the OM macro/ring flashes you have. Both the chosen lenses achieve their AF internally so the lens tube does not rotate when focusing. The lens tube does traverse fore and aft and in the case of the ZD35mm Macro, protrudes a good inch at 1:1, so bear in mind you are attaching a quite large 'mass' to the front of the lens so there is bound to be some additional strain put on the internal mechanisms. I do not believe the additional weight of any of the flash units pose a threat to your lens but please, do this at your own risk. It may be possible to utilise other ZD lenses, those with filter threads of 58mm by stepping down from 58mm to 55mm, but I'm sure this would bring spherical vignette so I haven't pursued it further. If you fancy trying it, let me know how you get on. In any case the two lenses I have adopted are best choice for the intended purpose. ILLUSTRATIONS: Below are a couple of photo's of my set up. Other than having to use manual they offer virtually all the functionality of the new E-system macro/ring flash units at a fraction of the cost.
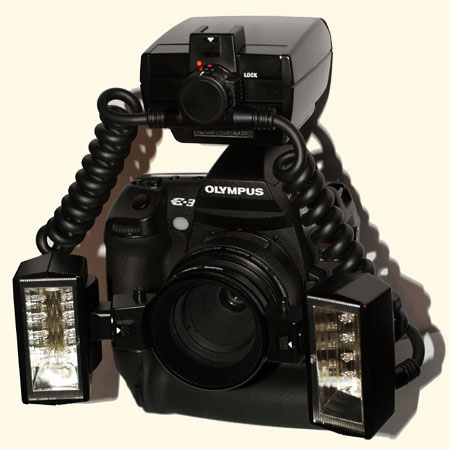
OM SYSTEM T28 MACRO FLASH - NOTES: The T28 has a bayonet connection to the T(32) controller that incorporates an additional flash shoe positioned on top of the controller. This bayonet has an in-built switch that offers the user choice of which flash to fire; left, right or both. The flash shoes on the central shoe ring allow each flash to turn in and outwards and each of the flash heads can move around the shoe ring making the whole outfit fully adjustable to where the user wants the light/shadow to fall.
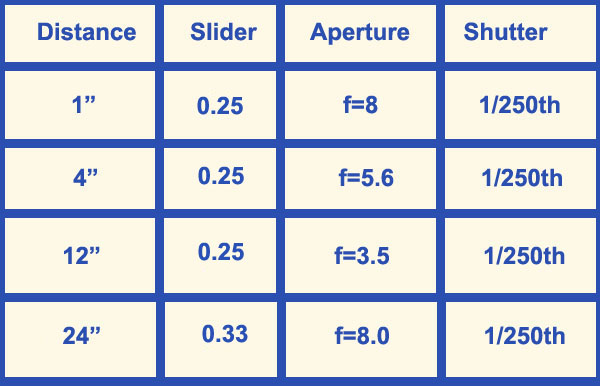
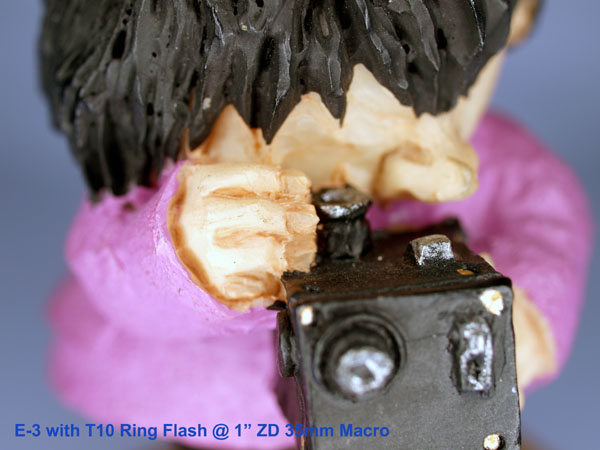
HOW TO USE THE OM MACRO/RING FLASH(ES) ON E-SYSTEM: Using these units with the E-system means you forsake any previous automatic control and need to use use the flash in manual mode without the panel, which is a lot easier than you might first imagine. In any case, the manual panel setting recommendations are of no use when using these flashes with the E-system. If you leave the panel on and follow its recommendations you will simply over-expose all your shots. For use with the E-system remove the panel completely. When you do so you and move the flash intensity slider from left to right, you will 'feel' it has 5 settings starting at the left that set the intensity; full, half, one quarter, one third and two thirds; these are unmarked but we can get over this simply with a piece of card. Using the original panel as a template mark its outline on some stiff card, cut it out and adjust its size so it slides in. You will need to cut a nib from the top left corner for the spring but cut this out carefully so the spring helps hold the card in place. Slide it into the back of the flash controller and mark the 5 different settings (see illustration below). Once marked this new panel gives you far more manual control than the OM system ever offered. This is Variable 1 - we can alter the flash intensity accurately. Variable 2: Working Distance. This is pretty straight forward and my experience indicates 4 basic distances; Ultra close - around 1" (1:1 on ZD35mm Macro); Close - that is between 4" and 1" (1:4 to 1:1.5 with ZD35mm Macro); Near - that is anywhere between 12" and 4"; Normal - that is anything over 12" but less than 24" which is roughly the nearest on-camera flash distance. Variable 3: Aperture. Between f3.5 & f22 depending on distance. Variable 4: Shutter speed. Use the shutter at 1/250th to start with. IMPORTANT: Please set ISO=100 on all E-Cameras. If this sounds complex, honestly, it isn't. You know your working distance and you can set the shutter speed at 1/250th; that's 2 'variables' dispensed with. Now you need only to set the intensity and a mid aperture and you can take your first shot. The AF will give you good focus and you can see how good the exposure is on the screen. Simply adjust either the aperture or the intensity to give you the perfect exposure. I have my E-3 set to display HIGHLIGHT so I immediately know if the exposure is near. I guarantee you will have the right exposure within 2 shots. From then on it is really easy to use and the more you experiment the easier it becomes.
To set you off I've included the table below with the settings for the 4 variables; in fact there are only two variables to start off with but I'm sure as you get more good results you will be altering all four to get the exposure spot on. This chart is designed around my experience with the T10 ring flash as this is likely to be the most common. However, the chart will give you a good head start for any of the OM macro/ring flashes. IMPORTANT: The chart below assumes ISO=100 on all E-Cameras.
As said earlier the whole process sounds far more complex than it is; once you have experimented you will soon have a 'feel' for the job in hand and be altering the variables to give you maximum depth of field available, or the fastest shutter speed you can get away with by halving/doubling the other variables. On the subject of shutter speed 1/400th on the E-3 is very usable as the shutter vignette is only the slightest darkening along the bottom edge of the frame (maybe 5 pixels in height) and can be easily cropped out. The shutter on other E-system cameras is not quite as generous but does give a clean image at 1/320th. A high shutter speed is imperative if you are photographing live insects for example. Of course the precise correct exposure depends on the subject material, colour and the ambient light so further opening and closing of the aperture around the suggested guide is ultimately up to you. We have all the necessary feedback on the camera via the screen and histogram. Don't forget to leave your INFO button set to show either shadow, highlight or histogram so you can check the results immediately. I've found that different E-Cameras give very slightly different results so it is not really possible to provide guidelines for each model. The chart above will get you within 1 stop of the correct exposure with any E-Camera. On a final note the T Controller has the usual 'CHECK' lamp on the back panel that glows if the unit 'thinks' the exposure is accurate. Ignore this lamp, it tells you the exposure was correct in virtually all circumstances. There follows three quick and dirty examples using the above chart I undertook with a favourite macro subject of mine, 'Stinker' who stands 2" high. Distance setting noted on images, all else as per above chart for that distance. JPG's straight from the E-3, not processed only resized for web viewing.
FULLY MODIFIED T8 & T10 UNITS: AN ARTICLE BY JAN STEINMAN My friend Jan Steinman from Canada, is especially interested in all aspects of macro photography has taken this article to a new level by converting T10 and T8 ring flashes to fully integrate with Olympus E-System four-thirds AND OMD micro-fourthirds camera bodies and lenses. You can read his fascinating article here and, if you wish, ask him to undertake this skillful conversion for you HERE. REMOVING THE UNITS: Take care (be gentle) removing the flash unit from around the lens. I have simply left my stepping ring on the ZD35mm Macro as a means to mount a 55mm filter and will do the same with the ZD50mm Macro when I obtain one. If you find the stepping ring is a little tight in the lens thread wrap your finger/thumb around the ring. This will warm it up slightly and expand it; hold the lens tube firmly and undo the ring. CONCLUSION: There's no conclusion to this article. It simply tells you how to take advantage of older (and some think obsolete) gear that you may already have if you have come the OM to E-system route. I know of several folk who are looking for the less expensive OM option for occasional E-system use. Most non-professionals are likely to use this set up for macro work only now and then, making this alternative financially very sound. Learning how to exploit the older equipment also reminds us of all the elements that make up a photograph and in today's fully automated world, that's no bad thing.
NOTE: This article seeks nothing other than to inform. Only you can decide what equipment you want/need for your use. I own most of these cameras/lenses, out of my own pocket; I have nothing to gain or lose by publishing this article, photographs, examples or opinion.
|