E-SYSTEM
E-620
how to set up/customize your new camera
|
E-SYSTEM
E-620 how to set up/customize your new camera
|
|
GLOSSARY of ABBREVIATIONS: I have been asked to provide a small glossary of the more common abbreviations I use throughout various articles appearing on this website. Abbreviations, while useful can be difficult to understand, especially for those whose native language is not English.
AEL/AFL = Auto Exposure Lock/Auto Focus Lock
AE = Auto Exposure
AF = Auto Focus
CCD = Charged Coupled Device
CD AF = Contrast Detect Auto Focus
CMOS = Complementary metaloxidesemiconductor
CW = Centre Weighted (metering)
DOF = Depth of Field
DSLR = Digital Single Lens Reflex camera
EFL = Equivalent Focal Length (on a 24x36mm film camera)
ESP = Electro Selective Pattern (metering)
EVF = Electronic Viewfinder
fps = frames per second
GN = Guide Number (flash)
I.S. = Image Stabilization
LCD = Liquid Crystal Display
MP = MegaPixels/Mega Photosites
OMZ = OM Zuiko (lens)
ORF = Olympus Raw File
OVF = Optical Viewfinder
PD AF = Phase Detect Auto Focus
RC = Remote Control
SSWF = Supersonic Wave Filter (body feature)
SWD = Supersonic Wave Drive (lens feature)
TTL = Through The Lens
USB = Universal Serial Bus
ZD = Zuiko Digital (lens) BACKGROUND Following the amazing popularity of the article 'How to Set-up/Customise your E-420' that appeared on this website in January 2009 (here), and several requests to repeat the exercise for the E-620, I've done just that. Of course no single set of customizations will suit everyone's needs or requirements and indeed as we get to know and understand our cameras better, our choices may well change; but this article will get your new E-620 set up to perform at an optimal level with further fine-tuning of the parameters up to you. For each setting I normally discuss and explain the options and how they will affect the output but firstly I stongly urge you to carefully read the manual and secondly please familiarise yourself with the menu structure.
E-620 SET-UP - NAVIGATION INDEX: This is a lengthy article so I've split it into the 5 MENU sections with links for ease of navigation. These are:
Please enjoy your reading and research: once you've completed the initial set-up, try not to tweak too many settings at once as you can soon lose track of what you've changed (and why). Don't forget to read the E-620 manual at least once. There's a PDF here you can place on your desktop.
MENU - CAMERA 1
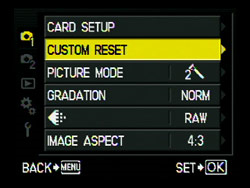
CAMERA Menu 1: Has 6 primary headings; Card Setup, Custom Reset, Picture Mode, Gradation, File Type/size, Image Aspect.
CARD SETUP (CF/xD; All erase, format) dependent on card selected (see COGS H, choice 6) If you use one card only either Compact Flash (CF) or xD, the machine simply recognises which slot is occupied. If you use both you can choose which one will be used first by selecting CF or xD in COGS H, Choice 6. Card Setup allows you to delete or format whichever card is given preference.
CUSTOM RESET (Reset, reset 1, reset 2) - reset to defaults or to the settings of your choice (MyMode) Of all the menu options this is the most confusing yet potentially the most useful. Simply it gives you the option to store 2 sets of your preferences and be able to restore the camera to all factory defaults. Here you can setup 2 restorable settings with various choices from most of the E-620's menu/settings. Resets only work in modes P, A, S, & M. There are three resets: RESET that restores the factory default; and RESET 1 & RESET 2 that can be used to store two sets of the users (your) preferred settings. If the selection is greyed out the camera is in 'AUTO' or 'SCENE' or 'ART' mode; change the mode dial to P, A, S, or M. HOW TO USE: In the Custom Reset Setting option press the right arrow button. A box lights that shows: RESET RESET 1 | NO DATA RESET 2 | NO DATA If there are already recorded settings the slot will read SET rather than NO DATA; this means customization has ocurred. RESET By default the top slot is highlighted. If you press OK a simple YES/NO box pops up. YES will restore the camera to factory default; NO will do nothing but return you to the MENU. A factory reset does not over-write the contents of RESET 1 or 2. To store your preferred settings leave this menu item now and set up your camera to reflect your first set of preferences. You can find the 45 customizable camera settings in the camera manual Chapter 12, page 136. Set up the camera with your fisrt set of preferred options then go to: RESET 1 or 2 Select RESET 1 or RESET 2. If the slot already shows 'SET' you can clear past custom settings by pressing the right > and then selecting RESET. The camera will now show NO DATA. Now highlight SET and press OK. The camera will remember your stored settings in each of the two slots. IMPORTANT: Setting and resetting a slot are done without the any further YES/NO box. OBSERVATIONS: This is a very clumsy and confusing interface and you will need to practice it several times. But this feature is useful if (say) you usually shoot in A mode with certain applied over-rides and then in M mode (for macro work for example) with a different set of preferred options. It would be useful if the camera could tell the user which set of preferences were going to be used on start-up. As it is the user has to check in the menu.
PICTURE MODE: Vivid, Natural, Muted, Portrait, Monotone There are five picture modes each offering adjustable profiles, should you wish to alter them. Each of the four colour modes offers adjustable parameters -2 -1 0 +1 +2 in each of contrast, sharpness and saturation whereas the Monotone mode offers adjustable parameters of contrast and sharpness plus a B&W filter (neutral, yellow, orange, red, green that simulate attached filters with B&W film) and a Picture Tone (neutral, sepia, blue, purple and green over-hues) for special effects. You are offered this choice so you can simulate the effects of differing films you might have used in the past by adjusting the parameters. Or you can simply refer to them as they are - Vivid, Natural, and Muted, Portrait and Monotone each with either its own default or your specified combination of contrast, sharpness, and saturation to suit your expectations The camera remembers your imposed settings even through a camera reset to factory default. Alternatively you can register your choices within a data set (Reset 1 or 2). As Andrzej Wrotniak discovered the designers of the Picture Modes applied their own settings to each mode before setting those levels as factory default so that any overrides you subsequently apply will be applied in addition to those factory set. This means that even with all three settings at the factory default, various modes will differ in applied levels of contrast, sharpness, and/or saturation. Changes made to the Picture Modes are a matter of your personal taste but the default settings reflect what is generally held to produce acceptable images in each of the five modes. If you choose to alter these settings my advice is to do so judiciously or your results may look over-done. Also, set them only one at a time until you are happy with that particular parameter, then move to the next parameter. Lowering the contrast settings will marginally extend the upper limits of the sensors Dynamic Range but if reduced too much will lead to flat looking images. Until you gain some experience leave this setting either on default or -1 for now. The E-620 has a slightly better Dynamic Range than (say) the E-420 so there's probably no need to drop the contrast to less than -1.
GRADATION: Auto, Normal, High key, Low key Gradation works with jpg's only; it does not apply itself to RAW data. Gradation is a combination of very slight exposure compensation plus manipulation of one or more zoned tonal curve(s) when the jpg is produced in-camera. What it does is manipulate the highlight and shadow areas of the image across those zoned areas to produce a more contrast balanced image, supressing the highlights and lifting the shadows. Here's my best description of the strength of each setting: NORMAL - No (or very little and/or subtle) effect on output. AUTO - As indicated the automatic application of slight exposure compensation to protect the highlights and gentle lifting of the shadows in processing. As with other E-System cameras with this facility, the E-620 result of the AUTO setting between base ISO and ISO400 is acceptable; over ISO400 leads to heightened noise in the shadow areas to the point where it is obvious and intrusive. At ISO800 for instance the results of the shadow noise generated by AUTO gradation become obtrusive. I'd recommend you use AUTO with care. HIGH KEY - Application of over compensation and additional processing to accentuate the highlit areas of the image. Can be effective when photographing brightly lit subjects in bright conditions. You can achieve the same results with the compensation button by applying +1.0EV. Similar (or identical) results can be obtained in SCENE MODE number 2. LOW KEY - The opposite of the above and useful when photographing primarily dark subjects in darkened conditions. You can achieve the same results with the compensation button by applying -1.0EV. Similar (or identical) results can be obtained in SCENE MODE number 3. OBSERVATIONS: Be wary of gradation especially if you shoot only jpg as once gradation is applied it cannot be undone. Unless you are aiming for a special effect avoid using HIGH/LOW KEY settings. AUTO works well between ISO100 - ISO400 and can help where there is high contrast areas such as lots of brightly lit areas and deep shadows but it comes at a price - more noise. Additional noise occurs in the darker areas of the image where the in-camera processing has 'lifted' the tonal curve of the darker areas accentuating the noise level. On balance I'd recommend you leave this set to NORMAL (which is effectively OFF). You can make just as good adjustments yourself in post-processing. Many users, including myself, have made the mistake of confusing AUTO and NORMAL modes; I repeat NORMAL is OFF. Unless you are sure you want the camera to apply gradation make sure you set it to NORMAL.
IMAGE QUALITY: RAW; RAW & JPG; JPG size & compression customizable This determines the size, quality and compression of your images and, ultimately, how many images you can store on your card. Olympus have moved to a new system of choice: RAW, Large, Medium and Small with further classification of dimention in pixels with a further layer of compression resulting in Super Fine, Fine, Normal, Base. The RAW image is the whole image data off the sensor compressed losslessly into an ORF (Olympus Raw File). JPG images are subject to overall size, dimention and compression determined by the user. Additionally you may also specify that the camera records RAW + a predetermined size of JPG. The choice here is between RAW, RAW + JPG (Fine & Normal) and JPG (Fine & Normal) only. Later in the camera set-up (COG G) you can determine some of the storage parameters and compression ratios that range between 1/2.7, 1/4, 1/8, 1/12 for each size of stored image. NOTE ABOUT FILE SIZE & COMPRESSION RATIOS: As a DSLR user I'm assuming you want to get the best image quality (IQ) from your E-620 as possible, otherwise you'd still be using a compact. That being so then you will select either RAW or Super fine JPG as your basic choice. (I'm not going to enter the RAW vs JPG debate). RAW files come with their own lossless compression over which the user has no control. JPG's have four compression ratios to choose from; non of them are lossless. Each time you re-write a JPG there is, theoretically, some loss of fine detail because the data is compressed and the tighter it is compressed the higher is this detail loss. When you compress a JPG too much the data loss can be seen in the image as artifacts, and we want to avoid artifacts at all cost. For all your JPG images always select the lowest compression ratio - 1/2.7. If you are desperate for memory space then select 1/4 but no higher. With memory so cheap these days it's hard to see why anyone would want to skimp on IQ (but there may be times such as on holiday when you are taking more images than you anticipated). OBSERVATIONS: Much depends on personal preference. I rarely use RAW but chose to exploit the excellent JPG engine Olympus offers in-camera and keep post processing to a minimum, so my images are recorded in LARGE Super Fine JPG at the lowest compression of 1/2.7. When I choose to record the RAW data I set RAW + LSF JPG. There is an argument that memory (flash cards) is currently very cheap and therefore not a constraint. While this is true (hence choosing the highest resolution and lowest compression of JPG) RAW data is larger, takes up more space on your memory card and hard drive and needs to be processed into a JPG anyway. On the other hand many class RAW data as the digital negative which should be kept ad-infinitum to take advantage of improvements in RAW processing software as it progresses. The choice is yours.
IMAGE ASPECT: 4:3, 3:2, 16:9, 6:6 This feature first appeared in the E-30. It works by the camera software applying a 'mask' to the JPG data to coincide with the image aspect. If you have Live View enabled you can see the effect on the screen when the appropriate black border appears; NOTE: there is no masking applied to the viewfinder. With the E-620 the user can choose between the above 4 image aspects. The selection screen also shows the affect of your choice on the jpg size of the recorded image (the size of the jpg is reduced). If you apply an image aspect the RAW data does not change but the jpg data is smaller. For example if you record in 4:3 the RAW data will be 4032 x 3024 pixels as will the LSF jpg; if you choose 6:6 the RAW data is still 4032 x 3024 but the jpg drops to 3024 x 3024. OBSERVATIONS IN USE: I've got mixed feelings about this feature. I can see the attraction because I was very interested to experience it myself (I used to shoot medium format 6cm x 6cm and grew to love that particular aspect ratio.) To fully use the feature you must have Live View enabled (obviously). So, accurate composition is via the rear screen only. Whether this presents you with problems is, I suppose, a matter of personal experience. It is however, made easier thanks to the multi-position screen of the E-620, but I suspect many SLR/DSLR users may find this strange territory in all but tripod work. Also, please remember the mask, when set to 6 x 6 for example, is in reality, only 4 x 4cm on the screen, so 'critical' composition is not necessarily that easy. However, when you use any of the CDAF enabled lenses you don't have to worry about accurate focus as these lenses are extremely good at AF off the sensor. For those graduating from advanced compacts the use of the back screen will be second nature. Those shooting in RAW+JPG will have to choose between the 'finished' JPG or develop the RAW image and then crop to the desired image aspect. That being so, the feature is aimed more at the JPG shooter. GENERAL OBSERVATIONS: It strikes me this feature offers only a small advantage over what you could achieve in post processing. But it does allow you to get the 'feel' of the relevant aspect ratio by using the masked screen which should improve the overall composition over the viewfinder. For this reason the feature does provide a better way of achieving a different image aspect and therefore adds to the appeal of the camera. And for those who wish to do as little post processing as possible it is certainly useful.
MENU - CAMERA 2
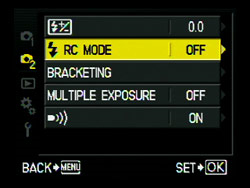
CAMERA Menu 2: Has 5 primary headings; Flash Compensation, RC Mode, Bracketing, Multiple Exposure, Sounds.
FLASH EXPOSURE COMPENSATION: -3EV to +3EV by 1/3EV increments This allows you to increase/decrease the base setting (power) of your flash. If you find the on-board flash tends to burn out your subject then set the compensation lower than 0 and vice versa. However, remember you may also chose to have any flash compensation applied to any ordinary exposure compensation you impose, or not (see COGS F; choice 3); a combination of both compensations may well throw your exposure off, so be wary. OBSERVATIONS: Always try any flash compensation along side any ordinary exposure compensation you have dialled in and then lock the setting in COGS F/3. In normal circumstances leave the flash compensation set to 0 unless the flash is too strong/weak; then compensate.
FLASH RC MODE: On/Off (controls wireless flashes FL36R/50R) This setting allows you to remotely use multiple compatible (RC) flash units that can be controlled and adjusted from the camera menu. If turned ON the camera menu will always request the flash settings to be input; leave switched OFF. OBSERVATIONS: Most folks will not be using such a set up so leave this set to OFF. When using a multiple flash setup you will need to study the flash manual to set up individual flashes for the effect(s) you desire.
BRACKETING: The E-620 menu combines several bracketing features together in one place; AE, WB, FL, & ISO
AE (Auto-exposure) bracketing: Off, 3 frames/0.3EV, 3 frames/0.7EV, 3 frames/1.0EV A very useful feature providing three frames with your choice of applied compensation. Use when critical exposure is required or when undertaking HDR. Camera takes first shot normal, second - EV, third + EV. You have to press the shutter 3 times or set to multiple exposure and count three. Some HDR exponents would like more than -/0/+ 1EV say up to 2EV. This may be good for HDR but for normal photography may be a step too far. OBSERVATIONS: For normal photography set to OFF.
WB (White Balance) bracketing: The E-620 has twin WB sensors, one internal (off the sensor) and one external. The provision of both should make WB setting pretty accurate particularly as the camera has the facility to set your own custom WB in addition. I've got to agree with Andrzej Wrotniak here when he decribes WB bracketing as "Useless and wasteful". If you are experiencing particularly difficult mixed lighting that may give rise to WB issues I'd suggest you need to be shooting in RAW anyway and adjusting the WB to your satisfaction in processing. OBSERVATIONS: Leave this setting at OFF.
FL (Flash) bracketing: Off, 3 frames/0.3EV, 3 frames/0.7EV, 3 frames/1.0EV I'm struggling to envisage a situation where flash bracketing might be useful; more correctly where other compensations will not deliver the right exposure. Remember, you can flash compensate locked with exposure compensation which will surely give you the same results. Maybe I'm not understanding the relevance of flash bracketing. OBSERVATIONS: To me this setting is of dubious use and I'd suggest you leave it set to OFF.
ISO (Sensitivity) bracketing: Off, 3 frames/0.3EV, 3 frames/0.7EV, 3 frames/1.0EV To me this is basically no different from AE bracketing except the only thing that changes is the ISO value. For that reason it's maybe better to use AE bracketing. The only situation I can see where this may have a use is if you are experiencing tricky lighting conditions for which you are using the Auto Gradation settings. Bracketing ISO will offer you a choice from a series of three ISO settings. (I tried this and found that it worked where I had the camera set to ISO200 with Auto Gradation and got the most pleasing result from the ISO bracketed shot taken at ISO400.) Again, this setting seems to be aimed at JPG shooters. OBSERVATIONS: For the purpose of setting up your camera leave this setting at OFF.
MULTIPLE EXPOSURE: On/Off (2 frames only in JPG mode). The E-620 offers the function of superimposing two frames together as one image. Very useful for the creative photographer. If you shoot only in JPG's you can only put together 2 frames (see OVERLAY below.) Unless you enable Auto-Gain the images will be combined as recorded (with accumulating brightness). For normal photography set MULTIPLE EXPOSURE to OFF. AUTO-GAIN: When enabled the software reduces brightness by half so on combination of both images the level of brightness is more realistic. (OFF by default) OVERLAY: This allows you to choose up to 3 RAW frames on which to overlay your 2 multiple exposures. (OFF by default) OBSERVATIONS: Enable when required; otherwise set to OFF.
SOUNDS: On/Off Your choice to have the cameras 'beep' on or off. Personally I have it set to ON.
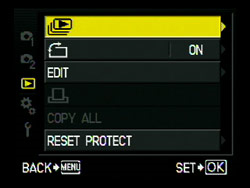
MENU - REVIEW
Slideshow: 1, 4, 9, 16, 25, 49, 100 frames (selectable number of screen images shown) On/Off: (change captured portrait orientation) Choices over these: RAW Data Edit and JPEG edit: Shadow Adjustment, Redeye Fix, Crop, B&W, Sepia, Saturation, Resize DPOF print marking: One, All Copies from one memory card to another (xD to CF or vise versa) RESET PROTECT: On/Off
None of these features are required to set up the E-620; for further details please read the manual.
MENU - COGS SCREEN 1:
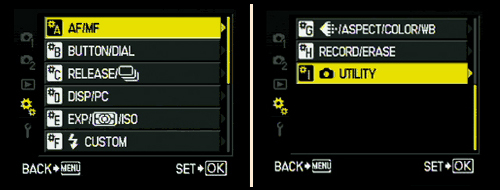
COGS Menu: Has 9 primary headings; (A) AF/MF, (B) Button/Dial, (C) Release, (D) Display/PC, (E) Exp/Metering/ISO, (F) Flash Custom, (G) File Size & compression/Aspect/Colour/WB, (H) Record/Erase, (I) Utility.
(A) AF/MF: LIVE VIEW AF MODE: AF sensor, Hybrid AF, Imager AF When using the LCD panel for composition you can determine which sensor the camera uses to achieve its AF. If you are using Contrast Detect capable lenses (9-18mm/14-42mm/40-150 Mkll/25mm pancake/14-54 Mkll/70-300mm) set this to Imager AF and auto-focus is achieved directly from the imaging sensor (LMOS). Using any other lens means the camera will confirm AF from the Phase Detect sensor behind the mirror, thus slowing the process of AF. Whichever setting you choose is over-ridden by the camera if it is NOT fitted with a CD AF lens - it will default to Hybrid AF in any case. OBSERVATIONS: Set to Imager AF as default; the camera will override this as necessary (lens dependent).
AF ILLUMINATOR: On/Off) Where there is insufficient light for accurate auto-focus you can enable/disable the auto-focus assist light. This light is generated by either the on-board flash when raised that emits a burst (strobe) of low light or if using an external Olympus flash (FL36/50 or FL36R/50R) which emits a beam of red light with a striped pattern on which the AF can focus. If enabled the internal flash has to be raised, or an external flash fitted, to work. Some users find the strobe light offensive to their subject if the flash is popped up. The AF assist light needs to be disabled if you are using any slave controlled studio lights as the strobe will trigger them too early. OBSERVATIONS: I set my AF illuminator to ON, but the AUTO POP UP to OFF in COGS F/4
AF MODE: Single AF, Cont. AF, Manual focus, Single AF + MF, Cont AF + MF Here the choice is between Single AF, Continuous AF, and Manual Focus with two more modes, S-AF+MF and C-AF+MF that use a combination of AF and MF. Single AF is probably the best choice because it satisfies most situations. But if your subject is moving you might need to select the C-AF tab. The hybrid settings of S-AF+MF and C-AF+MF are meant for use when the camera requires assistance by the photographer for fine tune focus. Because most Olympus 4/3rds lenses are fly by wire (focus ring is electronically controlled) the 'manual focus' element of focus needs to be enabled through this setting. Other lenses like the Sigma 30mm x 1.4 and the new ZD12-60 have a manual focus ring so this setting is obsolete for these units. OBSERVATIONS: I set all my cameras to S-AF.
C-AF LOCK; On/Off When enabled this prevents the camera constantly changing focus when in C-AF mode if something other than the subject passes across the frame. I believe it works by anticipating the degree of AF change; if the change is dramatic focus adjustment is disabled. OBSERVATIONS Whether you use C-AF or not it seems reasonable to have this permanently set to ON.
AF AREA: Centre; All Simple choice of which AF point you wish to use; centre or all. The E-620 allows you to change/override this setting by use of the AF point short-cut button and then using the wheel or the 4-way pad to select your chosen point from the seven point system. OBSERVATIONS Set this to all points as it is so easy to change when necessary.
AF AREA POINTER: On/Off. This enables the red AF illumination dot on the VF screen. OBSERVATIONS Set this to ON.
AF SENSITIVITY: Normal; Small When set to SMALL the sensitivity of the AF point is just outside the AF marker square. When set to NORMAL the AF point sensitivity is approx the spot meter circle. OBSERVATIONS Entirely up to you. Personally I have this set to NORMAL.
RESET LENS: On/Off (resets lens to infinity when camera turned off) When enabled the lens will reset to infinity on camera shut down. A sensible feature that is designed to protect the lens barrel. OBSERVATIONS: Leave this set to ON.
BULB FOCUSING: On/Off (selectable focus during bulb exposure) On occasions when you use the BULB feature (long exposure) you can chose to enable/disable any manual focus during the exposure period. (Will not work with Sigma 30mm x 1.4 and presumably ZD12-60mm). OBSERVATIONS: I can't recall ever wanting to alter focus during a bulb exposure so I keep this set to OFF.
FOCUS RING: Counterclockwise, Clockwise (direction of Focus By Wire focus rings) Here you may chose the direction you turn the manual focusing ring on Olympus ZD lenses when manually focusing. It is throw back to film days when different manufacturers had their lenses turn different ways to achieve infinity. OBSERVATIONS: Entirely up to you; Legacy OM lenses turn anti-clockwise for infinity.
(B) BUTTON/DIAL DIAL FUNCTION: you may select what the command dial(s) control: (a) Program mode: Program Shift, Exposure Comp (b) Aperture priority mode: Aperture, Exposure Comp (c) Shutter priority mode: Shutter speed, Exposure comp (d) Manual mode: Shutter Speed, Aperture) The E-620 has only one control dial. The above choices select exactly what the control dial changes in each of the four modes P, A, S, M. OBSERVATIONS: These settings reflect personal preference. It is less of an imperative when the camera has only one dial. Much depends on the type of photography you do. I have left these settings on factory default.
DIAL DIRECTION: Dial 1 (selectable for effect of turning the dial L or R) As indicated determines how the selected feature reacts when the dial is turned. OBSERVATIONS: I have the dial set to turn to the right. This means that in A mode when I turn the dial away from my eye (to the right) the aperture closes and vice versa. To me, this seems logical.
AE/AF LOCK: (a) S-AF: Mode 1, 2, 3 (b) C-AF: Mode 1, 2, 3, 4 (c) MF: Mode 1, 2, 3 Here you determine how the AE and AF functions respond when the shutter button and/or the AEL/AFL button (just right of the viewfinder) are pressed. A choice is offered for each focus mode available; S-AF, C-AF and MF. For each focus mode is offered several pre-determined sequences. This setting does not change focus modes, only how the buttons react in each focus mode. The E-620 offers this choice as with most E-system cameras. I have studied and played with every AE/AF Lock combination on offer and I conclude that unless you have an over-riding need to change the pre-sets, stick with the factory defaults as they are very logical. OBSERVATIONS: Leave the setting on default unless you know exactly what you want in a particular focus mode.
AE/AF LOCK MEMO: On/Off (makes button sticky) I struggle with this feature; when I use it in the OFF mode, I wish it were a 'sticky' button. But if I make it sticky by switching it to ON then forget to toggle it off after I've taken the shot it can spoil the next exposure because the previous settings are 'locked' into the camera. OBSERVATIONS: On balance I agree with Andrzej Wrotniak when he insists on having the feature set to OFF. For those occasions when you need to lock the settings - such as putting together a panorama - enable it for that period only, then switch it OFF.
FUNCTION BUTTON (1): Face Detection, Preview, Live Preview, One-touch WB, AF Home, Manual Focus, RAW, Test Picture, MyMode, Off (programmable button) Allows you to set the function of the Fn Button (left on the 4-way controller). This is entirely a matter of choice for the user. OBSERVATIONS: Personally I have it set to PREVIEW.
MYMODESETUP: MyMode1 & MyMode2 Ostensibly, this menu item allows you to store two sets of personal 'MyMode' settings in addition to the two Custom Reset settings. There are slightly more settings registerable for MyMode than custom reset (according to the manual). OBSERVATIONS: For this to work you must assign the Fn button to the MyMode feature. I think it is highly unlikely you will want to sacrifice such a useful button to this task as there are much more useful camera functions available for the only Fn button on the camera. Without a direct MyMode access button the usefullness of MyMode recall is highly dubious. This is a disappointment because if it were properly executed (ala C-5050/5060) it would be extremely useful indeed. (In any case even with certain settings registered (SET) in MyMode and the Fn button so assigned the feature did not work on the E-620 I have!!) You will be better off using the more accessible Custom Reset feature to recall specialist settings and ignoring MyMode altogether. All that said, niether of these functions are particularly user friendly.
BUTTON TIMER: 3, 5, 8 seconds or HOLD Here you can choose the length of time the buttons stay active; 3, 5, 8 seconds or HOLD. While the camera is new you may want a longer period to consider the options having pressed a button. When you have the camera set up to your liking the button period could be less. It's personal preference. OBSERVATIONS: Set this to 8 seconds to start with; reduce if required. I leave mine on 8 seconds as a further press of the button closes the screen anyway.
AEL/AFL FUNCTION SWAP:On/Off If you wish you can swap the (assigned) Fn button task to the AEL/AFL button and vice versa. I'm not entirely sure why you would want to do so, but the ability is there. OBSERVATIONS: Entirely up to you; I leave this set to OFF.
4-WAY FUNCTION:On/Off/[---] The 4-way controller keys can be alternatively set to control AF point selection rather than the task assigned to them as shown on the keys (WB, AF, ISO, Metering). If you do enable this it works for about 30 seconds after an exposure then the 4-way pad does nothing (does not revert to default). This seems an unecessary duplication as with a single press of the AF point button [---] this task is given to either the keys and/or the dial. I can see if you enable this it may lead to accidental adjustment. OBSERVATIONS: To have the 4-way controller behave as per the 4-way button markings set to ON. If you want to enable the AF point selection set to [---].
FUNCTION BUTTON 2: Direct (as is), AF Area, AF Mode, WB, Metering, ISO Allows you to set the function of the DRIVE button (top plate left shoulder). This is entirely up to you. OBSERVATIONS: Personally I leave it set to DRIVE as I use the remote control quite a lot when testing.
(C) RELEASE & FPS RLS PRIORITY S: On/Off (RLS = release) The 'S' setting allows you to override the camera and force the it to fire the shutter whether or not AF is achieved, when in S-AF or S-AF+MF mode. OBSERVATIONS: Unless you specifically need this feature, set to OFF (default).
RLS PRIORITY C: On/Off (RLS = release) This is identical to the above except it relates to C-AF or C-AF+MF modes. OBSERVATIONS: I rarely use C-AF but can see that it is probably better to have this set to ON (default).
LOW FPS: 1, 2 or 3 FPS (frames per second) This setting is linked to the 'DRIVE' button screen that lets you choose single frame, high FPS or low FPS etc. The E-620 will shoot at a maximum of 4FPS (HIGH). Low FPS allows you to set the FPS rate for those occasions you do not require high speed FPS. OBSERVATIONS: I have this set to 3FPS as 2 seems too low and 1 is single shot mode anyway!
(D) DISPLAY/PC: VIDEO OUT: NTSC/PAL OBSERVATIONS: For those in UK set to PAL; US set to NTSC.
SLEEP: 1, 3, 5, 10 MINUTES/HOLD This choice determines how long the camera remains 'alive' (rear screen and functions switched on) before entering its sleep mode. Obviously this setting may affect battery life. OBSERVATIONS: I find 1 minute too short and have settled for 3.
BACKLIT LCD: 8, 30, 60 seconds/HOLD You may think this is the same setting as above; but this tells the rear screen backlight only how quickly to go off regardless of the above choice. OBSERVATIONS: I set this to 30 seconds.
4 HOUR TIMER: 4h/OFF Regardless of the two above settings the camera clock will turn the camera completely OFF after a period of 4 hours with no use. When this occurs you will physically have to turn it off and back on. OBSERVATIONS: Not hugely important but I leave this feature at 4h (default).
USB MODE: Auto, Storage, MTP, Control, Easy. Here you determine the state of the cameras USB interface. AUTO: I'm not entirely sure; if it is fully automatic why have the other choices? STORAGE: The most important setting - this is required for upgrading the firmware. It also allows the connected PC to 'see' the cameras memory card as an external disc drive. CONTROL: Enables the interface from software programmes such as Olympus Studio to control the camera functions. MTP: Not sure what this does. EASY PRINT & CUSTOM PRINT: If printing direct from camera memory card with any PictBridge enabled printer. OBSERVATIONS:The only time I ever change this setting is during firmware upgrades. Leave as default (AUTO).
LIVE VIEW BOOST: On/Off When set to ON the LV screen will automatically adjust brightness level in use. See this article here ; I do not know if this problem is now resolved - I have not had sufficient time with the camera. OBSERVATIONS: Until determined leave at default (OFF).
FACE DETECT: On/Off Remember face detect can only be seen to be working in LV mode. Obviously, if you wish to use face detect you should enable it here. OBSERVATIONS: Unless you wish to use the face detect function leave this set to OFF.
INFO SETTING: When you use the INFO button on the camera to scroll through the reviewed image or the Live View image there are a series of overlaid screens with different information which appear. Most of these screens are useful but you may want to disable or remove them from the sequence if you find them annoying. This menu setting allows you to do just that. You can choose the screens to be seen in Review mode (choice of 4) or Live View mode (choice of 7). OBSERVATIONS: Not hugely important but I leave this feature at default. Change as you desire.
(E) EXP/METERING/ISO: EV (Exposure Value) STEP: 1/3, 1/2 or 1EV Here you can set how the camera measures and displays exposure values (aperture and shutter) in its viewfinder read-out. For example a 1EV aperture progession will read f2.8 - 4.0 - 5.6 - 8.0 - 11 - 16 - 22 whereas a 1/3rd aperture progression will read f2.8 - 3.2 - 3.5 - 4.0 - 4.5 - 5.0 - 5.6 - 6.3 - 7.1 - 8.0 - 9.0 - 10 - 11 - 13 - 14 - 16 - 18 - 20 - 22. (ZD lenses open/close the aperture in 1/3rd steps.) Measuring, determining and expressing EV is critical to good photography. As Olympus cameras are capable of using the 'fine' measure of 1/3rd EV it sems crazy not to use it. OBSERVATIONS: You can opt for your EV steps to be by 1/3rd, 1/2 or 1EV. Personally I have mine set to 1/3rd.
METERING: OBSERVATIONS: You have 5 choices; ESP, Centre Weighted, Spot, Hilight Spot, Shadow Spot. This depends on your shooting requirements but for 90% of the time I set my metering to ESP (Electro-Selective-Pattern)
AEL METERING: Auto, Centre Weighted, Spot, Hilight Spot, Shadow Spot. When you use the AEL button to 'Lock' the exposure settings for a particular task, this menu choice allows you to determine the metering pattern you wish to be used with the AEL button as opposed to the shutter button. Your choices: * Auto: Selects the same metering pattern that you have already chosen for non-AEL. * Center-weighted: Self explanatory; uses CW. * Spot: Self explanatory; uses SPOT. * Highlight Spot: Self explanatory. * Shadow Spot: Self Explanatory. OBSERVATIONS: I have mixed feelings about this. I can see by setting this to say 'SPOT' it will be useful as a rapid way of accessing spot metering without using the Super Control Panel or dedicated button. But I also see the risk which is that your series of 'locked' exposures (say for a Panorama) uses a less familiar metering pattern and may spoil your series. On balance I've decided to leave this setting to AUTO and change the metering pattern manually when required. This is because I don't trust my memory to remind me that I've set a different metering pattern for AEL exposures.
ISO: Here you set the ISO (sensor light sensitivity) value. You have a selectable range of 100-3200 in 1/3rd steps or single steps + an AUTO setting. If you choose AUTO the camera 'calculates' from the exposure criteria (aperture and shutter speed) whether to raise the ISO value to increase the shutter speed to avoid camera shake in low light situations. There is no correlation (that I can see) during this calculation that takes into account if you have Image Stabilization enabled. That being so you may obtain a good, clean stabilized image that is free from camera shake but spoiled by too much noise because the camera has chosen to automatically increase the ISO value. Personally, I think AUTO ISO is a perhaps a step too far. It's up to the photographer to judge the required ISO as you determine, not the camera. However, if you absolutely want to use AUTO ISO you can set its upper limit later in the menu. OBSERVATIONS: I set ISO according to the conditions I'm shooting in and/or the results I'm trying to achieve. For everyday use with the those of my E-Cameras that offer a highest ISO of 3200, I'm using a base of ISO 100/200 (see update note below) with a self-imposed raised limit of 800 and a highest limit of 1600. For those cameras with a highest ISO of 1600 I'm still using ISO 100/200 for everyday use but not going above ISO 800. I reserve settings above ISO 1600 for emergencies. I do try the lower range of ISO values to see if, say, ISO 200 offers any advantage, but I normally settle back to my self assumed base level of ISO 100/200. So my recommendations for the E-620 is base level = ISO 100/200, normal upper limit = ISO 800, raised upper limit = ISO 1600 (with great care to get the exposure correct) and ISO 3200 strictly for emergencies. UPDATE NOTE: There has been a lot of discussion on the forums about the 'native' ISO of the E-620 being ISO 200 rather than ISO 100. Some of the examples shown demonstrated that ISO 200 preserved the highlights better than ISO 100, but at the expense of slightly 'muddy' shadows (blacks). Some quick tests I've done concur with this observation. If you shoot RAW you have a better chance to regain any blown highlights from ISO 200 than ISO 100 and keep the blacks in the shadows reasonably dark. With JPEG using CS3's Shadow/Highlight tool, the results were very similar to the developed RAW's in both highlight and shadow - better from ISO 200 than from ISO 100. OBSERVATION: If you are shooting in condtions with heightened DR and you are concerned about the highlights switch to ISO 200. But be selective; you may find adopting a base of ISO 200 offers advantages but you will experience slightly more noise in the shadows.
ISO STEP: 1/3rdEV, 1EV. Here you can set the step by which the ISO is adjusted. The smaller value is 1/3 EV; for example the progression is ISO 100, 120, 160, 200 - so 3 steps per ISO stop. The larger value is 1 EV so the progression is ISO 100, 200, 400 - 1 step per ISO stop. The 1/3 EV choice offers a 'fine' step which some folk prefer; the larger value means you scroll through the ISO values much quicker. OBSERVATIONS: Personally I use 1EV.
ISO AUTO SET: See ISO above. Here you determine both the highest value you allow the camera to select if you enable AUTO ISO and its default (lower) value. You are setting two parameters. HIGH LIMIT Sets the maximum ISO value the camera can select if AUTO ISO is enabled. You can select any value between ISO 200 and 3200. DEFAULT Sets the minimum ISO value the camera can select if AUTO ISO is enabled. Again, you can select any value between ISO 200 to 3200. OBSERVATIONS: As said above I do not use AUTO ISO. If you do then it might be wise to set the high limit to ISO 800 and the low limit to ISO 200. Correct ISO selection is quite critical and something I'd encourage you take responsibility for.
ISO-AUTO: P/A/S, ALL I struggle to see the use for this choice. Here you can determine in which of the AE modes you will allow Auto ISO to be enabled. To make things more complicated there are two choices: P/A/S: program, shutter and aperture priority modes; OR All: the above modes PLUS manual. If for example you set to ALL you effectively disable parts of the manual exposure mode by handing the choice of ISO to the camera. In either setting it is also not possible to apply any exposure compensation, a situation which is counter-intuitive. OBSERVATIONS: As this setting takes effect only if you enable ISO AUTO SET (and I strongly advise against this) it's probably wise to leave the setting at default (P/A/S).
BULB TIMER: This setting determines how long the shutter will reamin open in the BULB mode regardless of whether you are holding down the shutter. OBSERVATIONS: I rarely use the BULB mode so I leave this on default of 8 minutes, but your mileage may vary.
ANTI-SHOCK: Also known as Mirror Lock/Mirror Up In olden days when dinosaurs walked the earth, mechanical 35mm cameras were fitted with a device that turned and locked the mirror in its uppermost position and effectively removed the mirror flip (ker-plunk) out of the exposure equation. Initially this was to to facilitate the projection of the rear element into the exposure box. But stopping the mirror from flapping about was good for imaging as it removed a lot of vibration from the camera body, and so benefitted (sharpened) the exposure. Its downside was you couldn't see anything through the VF! With DSLR cameras the same principle applies, it's just achieved differently. An additional delay is built into the exposure process that holds the mirror in the up position before allowing the shutter to open/close. It is this delay that's called ANTI-SHOCK. When you set anti-shock from 1 to 30 seconds this determines how long the mirror stays up before the shutter is fired. This allows the vibrations caused by the mirror flapping about to subside before the shutter fires. Normally a setting of 5 seconds will allow all vibrations to pass. Now, with the E-620 (and newer models) if you set ANTI-SHOCK you don't get anti-shock until you then select the correct icon in the DRIVE mode screen. When ANTI-SHOCK is enabled the DRIVE mode screen icons double from 7 to 14 (all are repeated with a small diamond next to them) and you have to scroll through them to select the appropriate drive mode for your upcoming image. It's a bit messy but I can see some rationale. In the past (with E-1) I've used ANTI-SHOCK and forgot to turn it off. Next time I use the camera I press the shutter button and nothing happens (well the mirror flips up). I look befuddled for a few seconds and take my eye and camera off the shot to suddenly hear the camera making the exposure! Then I realise what's happened so then have to dive into the menu to switch off the feature. This takes a while even if I can recall where in the menu anti-shock resides. With this system (from E-420/520 on) access to anti-shock is now part of the DRIVE mode IF you enable it. This makes a little more sense than the alternative menu diving. It's not ideal but it's quicker. OBSERVATIONS: If you ever use ANTI-SHOCK I'd advise you to set it at 5 seconds and leave it. When you want to use ANTI-SHOCK simply press the DRIVE button and scroll through the icons for the mode you want (though why there are sequential modes with anti-shock I'll never know). If you accidentally leave your choice as one of the anti-shock modes it is quite quickly put right. Not ideal but better than menu diving. NOTE: If you do not want to engage anti-shock please select one of the DRIVE icons from the first set 1-7; those without the diamond. The DRIVE icons with a diamond are those with anti-shock, and these are 8-14.
(F) FLASH CUSTOM: FLASH X-SYNC: This sets the fastest shutter speed with which the camera shutter will sychronise with the flash to leave no shutter vignette. The E-620's upper limit is 1/180th sec (default) but it can be lowered to a slow speed of 1/60th sec. OBSERVATIONS: I leave this at default.
LOW FLASH SHUTTER LIMIT: This setting allows you to set the slowest shutter speed which will synchronise with the flash in any of the AE modes P, Ps, A; that is the times when the camera determines shutter speed. Your choice is between 1/30th sec and 1/180th sec. If you subsequently use any of the SLOW flash modes this setting is irrelevant because the camera meters external light for that exposure. OBSERVATIONS: 1/60th or 1/80th sec seems about right to me.
FLASH COMPENSATION +/- EXPOSURE COMPENSATION: Here you determine if any flash compensation you have added is cumulative with any exposure compensation. You have two choices: ON Whatever flash exposure compensation is present is added to any exposure compensation; OFF Ignores any exposure compensation. OBSERVATIONS: Default (OFF) seems the most logical to me; YMMV
AUTO POP-UP (OF FLASH): Olympus insist on offering this feature. If the camera so determines it will pop up the flash for exposure or auto-focus assist light. Personally I like to decide this especially where peoples eyes are concerned. Here you decide whether to allow the E-620 to do so or nay. OBSERVATIONS: Set the AF assist lamp to ON, the flash to always on but the auto POP-UP to OFF. This way you can have flash or AF assist strobe at your whim, not the cameras.
(G) FILE SIZE, ASPECT, COLOUR & WB: NOISE REDUCTION: On, Off Auto. Here you choose the level of noise reduction you wish the camera to use when longer exposures are taken; (also known as dark noise or frame subtraction). In effect the camera subtracts an unexposed but equally long exposure from the actual exposure thus removing noise caused by the sensor. If enabled it engages when there are any exposures over 1 second. If DRIVE mode is set to sequrntial NR is switched off. OBSERVATIONS: It seems a perfectly logical thing for the processing engine to do so set this to either ON or AUTO. It only occurs with longer exposures in any case.
Noise Filter: Off, Low, Standard, High. This setting allows you to choose the 'strength' of the noise filter as it is applied in the JPEG engine (does not apply to RAW). The noise filter removes random noise caused by the sensor/sensor gain during exposure. Inevitably it also means some loss of fine detail. Do not be fooled by the OFF setting; all this means is the filter is set to a very low level which Olympus does not reveal but is the least intrusive or has the most acceptable level of detail loss. All four settings appear to be exponentially applied, being applied more and more agressively as the ISO value increases. Andrzej Wrotniak has an informative article on the subject and I suggest you read it here before setting this parameter. The cameras processor is trying to strike a balance between noise removal and detail preservation as ISO increases. You need to make a judgement where you wish that point to be. OBSERVATIONS: This is a setting I believe you should at least explore by experimentation. If you frequently use high ISO values you may wish to set the the noise filter lower (OFF or LOW) to preserve detail; if you rarely go above ISO 400 you may be happy with the setting at STANDARD. It is largely a matter of personal preference. Personally I have it set to LOW.
WHITE BALANCE: The camera has a series of predetermined WB values already stored. These have been carefully calculated to work with the cameras sensor and processing engine in varying lighting conditions. For the vast majority of the time you will select one of the pre-set values or leave the camera to choose the most appropriate one by using its external WB sensor by selecting AUTO WB. But you can store you own 'custom' WB for special circumstances and/or tweak the colour channels for any of the pre-sets. It should be noted that WB is applied only to JPEG images, not RAW. If you shoot RAW you can choose whatever WB you like in processing. OBSERVATIONS: Unless you are experienced in colour temperature I strongly recommend you leave well alone and simply choose the most appropriate WB from the list, or use AUTO, or set a CWB before a critical shoot. Incorrect WB is virtually impossible to correct in a JPEG image.
ALL WB COMPENSATION: All set, All Reset. Here you may prescribe any over-ride you wish to the global White Balance setting the camera uses for all JPEG processing. This is done via alterations to the channels Amber to Blue and Green to Magenta. The Reset option undoes any changes you make and restores camera defaults. OBSERVATIONS: Once again, unless you are experienced with colour temperature I suggest you leave this setting alone.
COLOUR SPACE: sRGB, Adobe RGB You may choose either colour space above (a set of colour criteria laid down to a standard and adopted by softwares controlling computer outputs such as monitors and printers). sRGB is by far the widest used though Adobe ostensibly offers a wider spectrum (gamut). Having once accidentally set my E-500 to Adobe RGB (then could not phathom why my output was 'different' I have never strayed from sRGB since. OBSERVATIONS: Colour space is almost a science in itself and is very complex (I do not profess to understand any of it); unless your whole system is set up to operate within Adobe RGB set it to sRGB only and leave it there.
SHADING COMPENSATION On, Off. With some lenses, especially wide angle ones, the collected light does not penetrate evenly across the sensor, leaving the corners shaded (this is known as vignette). When this happens the sensor recognises this vignette and can communicate with Olympus ZD 'smart' lenses which then tell the camera processor the area and level of brightening required to lighten the shaded corners automatically during processing. OBSERVATIONS: This is an automatic, non destructive and sensible enhancing feature; set it to ON.
IMAGE QUALITY SET: Large/Normal/Small, Superfine/fine/normal/basic (selectable size and compression) If you are a JPG shooter and with the price of memory (CF cards) getting cheaper there's little reason other than computer processing and HDD space to capture your images in anything other than highest resolution/lowest compression ratio. OBSERVATIONS: Set File 1 to Large/SuperFine and File 2 to Large/Normal. These settings will be reflected when you access the FILE settings in the CAMERA menu 1. Unless you have some overwhelming desire for reduced size or increased compression take advantage of the choices Olympus allows you for the best possible files from your camera. Pixel count: (selectable resolution for following sizes): Middle: 3200 x 2400, 2560 x 1920, 1600 x 1200; Small: 1280 x 960, 1024 x 768, 640 x 480 This allows you to set the resolution for the Middle and Small files. As you are going to use only the best resolution files you can ignore this setting though it might be wise to set Middle to 3200x2400 and Small to 1280x960 but NEVER select them as your choice of file size. ASPECT SHOOTING: LV/ALL OBSERVATIONS: Remember, when using the different aspect ratios offered, the cameras software will mask off the sensor (in jpg only) to the chosen aspect. Whichever aspect you choose is shown on the screen if you shoot using Live View. But here you chose whether to apply it to ONLY LV imaging or ALL imaging (+ through the viewfinder). Personally I think it is risky to apply it to all imaging because the viewfinder is NOT masked and you may forget you have chosen a particular aspect and thus be surprised when you see the jpg result having been cropped. I'd recommend you set this to LV.
(H) RECORD/ERASE: QUICK ERASE: On, Off. Should you wish to delete an image when reviewing, quick erase will simply erase the image without further question when you press the delete button. Default is OFF for good reason. OBSERVATIONS: Setting to ON is dangerous. There is no second chance to change your mind. Leave at OFF. RAW+JPEG erase: JPEG, RAW, RAW+JPEG (decide what is removed when you delete a RAW+JPEG photo) This selection only applies if you save your images in two formats (ORF and JPEG) consecutively. If so, and when you wish to delete the image(s) while being viewed, on pressing the DELETE button the camera will delete either one or the other or both formats together of the image, depending how you set this menu choice. I occasionally use RAW+JPEG so I have this set to JPG thus leaving the RAW version. If you never save in dual format then leave this at the default setting of RAW+JPG. FILE NAME: Auto, Reset Here you may set how the file number is recorded when taking an image either when starting a fresh sequence or with a new card. In this context the meaning of RESET = starts from new i.e. 0001; or AUTO = continues from the last recognisable sequence. OBSERVATIONS: This choice can lead to confusion. If you set to RESET there is the risk the camera may mark two files with the same number if two cards are used on the same day - not good. ALWAYS set this to AUTO. PRIORITY SET: This setting controls the box that pops up when you press the DELETE button when reviewing your shots. By default this is set to NO which means that you have to move the highlighted box from NO to YES with the cursor key in the ERASE mode (one additional enforced step that may prevent accidental deletion). If you set this to YES you do not have to move the highlighted box as it is set to YES. Effectively it saves you one stage in the delete process. I have all my canmeras set to YES - it is much quicker. DPI SETTING: Auto, Custom (allows setting of dpi) Of all the terminology associated with digital imaging DPI and PPI are the most confusing. Leave this setting on AUTO. CF/xD If you mount only one card this setting is greyed out. Where you mount both cards this setting allows you to set which is used first. I only use xD for emergency use so I have this set to CF. Your preference might be different though I doubt it. EDIT FILENAME If you wish to change the file naming that goes on in the background when shots are recorded to the card, this is where you can. You may change the first and/or second characters if you wish. Normally the file is prefixed with a 'P' (or '_' if working in Adobe colour space). The second digit represents the month (Jan = 1; ~ Sept = 9; Oct = A; ~ Dec = C. The next two refer the day thus a file named PC250157 is interpreted as Olympus File; December 25th: image number 157 out of a possible 9,999. OBSERVATIONS: I believe this is an understandable way to name files and can see no reason to change it. As I archive all my images by date I can see the date of any file via this number. So, I have left mine at default setting OFF/OFF. However, you may have different needs.
(I) UTILITY: PIXEL MAPPING: Olympus offer this feature for your use whereas other companies charge you a maintenance fee for the same. Special in-camera software will map out any bad pixels on the sensor. Olympus recommends you do this at 3-6 monthly intervals. OBSERVATIONS: Run infrequently at the recommended interval. Do not over use.
CLEANING MODE: mirror lock up for manual sensor cleaning Should you ever need to clean the sensor (unlikely as Olympus' SSWF cleaner is the most effective preventative measure designed) this selection allows you access to the delicate membrane in front of the sensor. To use remove the lens, enter this menu choice and press and press START, a screen appears telling you to use the shutter button to start the process. On pressing the shutter the camera flips up the mirror and opens the shutter giving you access. When finished the process is reversed by powering off. OBSERVATIONS: Proceed with great care for these reasons: Should the battery deplete while you are cleaning, the shutter will close and the mirror will flip back down resulting in damage to one or both. If there are foreign objects stuck to the membrane that cannot be dislodged by repeated operation of the SSWF mechanism I'd suggest they may well be beyond removal by DIY methods at home. Do not be tempted to use canned compressed air as it will damage the membrane. Sensor/membrane cleaning requires specialist tools and materials. Play safe and entrust this work to Olympus technicians; if they make a mistake you are covered.
EXT. WB DETECT The E-620, like the E-30 and E-3 is fitted with external sensor that helps the camera determine what white balance the camera should use when set to Auto WB. It is positioned between the grip and the prism hump being a small, round translucent device. It is possible to shield light from hitting the sensor with the shutter finger if relaxed which is not the best idea. OBSERVATIONS: The default is ON; it makes sense to enable this as accurate WB is essential.
AF FOCUS ADJUST: As with the E-30. the E-620 allows the user over-ride the AF system for up to 20 different lenses. This might sound great but I'm still unsure how this is to work and I've yet to find anyone who has got the system to function. To me this is more a factory setting as this is the only place likely to be able to accurately measure any focus discrepancy. Personally I think Olympus will come to regret this feature. OBSERVATIONS: I'm staying well clear of this feature - your mileage may vary.
EXPOSURE SHIFT: A setting for advanced/experienced users. It allows you to set a level of exposure compensation (+/- 1/6th ~ 1EV) for each metering pattern. This is completely separate to the cameras 'normal' compensation regime. It is, effectively, fine tuning the AE system. For example one of my E-1's is reserved for use with OM Zuiko legacy lenses and with these it's advisable to habitually under-expose by at least 1/3rd of a stop. Instead of using the cameras compensation button for every exposure (and if the E-1 had this feature) I could merely dial-in -1/3rd of a stop in centre-weighted metering. This would certainly save some time. I'd imagine 99% of users are happy with the factory settings but cameras can vary so it's possible this feature could be used by someone who can see their images are consistently a tad over or under exposed. In addition, The over-rides can be set independently for each metering pattern (ESP, CW, SPOT) and any applied settings are stored in the custom reset feature (slots 1&2). OBSERVATIONS: On no account use this until you have used the camera for at least 3 months and can readily demonstrate to yourself there is a consistent over/under exposure that is slight enough NOT to require factory re-calibration by returning your machine to Olympus. If you wish to use it, proceed with caution. UPDATED AUGUST '09 Having just clicked up several months with the E-620 I've concluded my example has a permanent tendency to slightly underexpose. Therefore, I've set the Exposure Shift in ESP to + 2/6th's. I will monitor this for a further month.
BATTERY WARNING LEVEL: LO, -2, -1, 0 +1, +2, HI If you believe the battery warning (green) lamp glows either too early/too late in your battery's normal cycle you can adjust it in this menu feature. You will have to experiment yourself to get the setting to your liking. OBSERVATIONS: Personally I'm happy with the factory default.
MODE DIAL SWITCH: If you use your E-620 with the designated underwater case you may want to swap the 'SPORTS' and 'NIGHT+PORTRAIT' slots on the mode dial for these two pre-sets, being: 'UNDERWATER MACRO' and 'UNDERWATER WIDE'.
MENU - SPANNER:
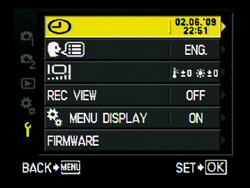
SPANNER Menu: CLOCK: Here you set the correct time and date; yes, it is important if you want that part of your EXIF information to be right! Bear in mind too the internal clock has no way of knowing the season (daylight saving) so you must alter this manually twice per year.
LANGUAGE: Here you select the language the camera must adopt in its menu system. There are 34.
MONITOR ADJUSTMENT: The E-620 monitor (rear) screens brightness and colour temperature can be adjusted through 15 points each. Personal preference.
Rec View: Off, Auto play, 1 - 20 secs (image review; auto play option enters playback mode after image recorded) This is the time in seconds the 'just taken' image is displayed on the LCD and is adjustable. In AUTO mode the image stays on the screen and you can instantly scroll through the exposure information (INFO button) and enlarge the image without having to press the review button. Nothing comes for nothing! With Rec View set to AUTO, using the camera on tripod and using the remote to trip the shutter (i.e. for all my testing sessions), I have to touch the shutter button to close the AUTO Rec View screen before the remote will work. Over time I have got used to this, but you may find it annoying. OBSERVATIONS: Personally and regardless of the above, I have Rec-View set to AUTO; as this saves me time. It means the image stays on the screen indefinately. Occasionally, I switch to timed display where I settled for 5 seconds.
COGS MENU DISPLAY: On, Off. This is completely new with the E-620. This setting allows you to turn off (remove from the main menu) the COGS sub-menu. A potentially life-saving setting if your camera is shared (or your memory is poor). The COGS menu contains all very specific camera settings that may take you some time/experience to fine-tune. All too easy to lose if an inexperienced hand explores the depths of the menu system. Having it switched OFF does not affect the two RESET slots so you could still have two users sets stored. Very useful.
FIRMWARE VERSION: Here you may check what version of the firmware the camera, lens and flash is using. For the latest firmware version(s) available go to Olympus, Japan. You will need to access the firmware from within Olympus Master or Olympus Studio. Not sure how to upgrade your firmware? This is the official method from Olympus HERE .
CONCLUSION This article continues from that documenting my setting up and subsequent usage of my E-420, which is still a very popular article on this website. It seemed pertinent to repeat the exercise for the new E-620. I do not suggest these settings are in any way perfect, but they will give you a good starting point especially if you are not particularly familiar with Olympus DSLRs and their menu systems. I encourage you to experiment with some of the more major settings to get the image output you require. You may also wish to read similar articles (just as I did), especially that on setting up the E-30 by my good friend Andrzej Wrotniak here. The two cameras share much in common and it might be wise to seek two independent views on certain settings.
NOTE: This article seeks nothing other than to inform. Only you can decide what equipment you want/need for your use. I own most of these cameras/lenses, out of my own pocket; I have nothing to gain or lose by publishing this article, photographs, examples or opinion.
|